Course 03 · Lesson 2 of 7 · Check, then water well
Reading moisture below the surface
A pot's surface dries first, so it can look dry over a root zone that is still moist, or damp over one that needs water. Learn to read moisture with a fingertip, a chopstick, the pot's weight, and the drainage holes, and where to check in a root ball that dries unevenly.
The question
How can you tell whether a pot needs water when the surface looks dry?
By the end of this lesson, you will be able to:
- Use at least two checks together, such as the chopstick, the lift test, a fingertip, and the drainage holes, to judge moisture below the surface.
- Explain each check's blind spot, and why a dry surface, green moss, or a probe meter alone is not enough evidence.
- Identify where to check in a root ball that dries unevenly, such as an old root ball inside fresh mix.
About 18 minutes to read and explore
Late March on the west balcony, an instructional example this course returns to: a fourth-floor balcony facing west in a temperate Northern Hemisphere city at about 40° N (USDA zone 7a). The gift juniper's spreading foliage hides most of its pot. In December it was slip-pottingMoving a plant's root ball, whole, into a slightly larger container and filling only the gap around it with fresh substrate, without loosening, washing, or cutting the roots. Because the roots are barely disturbed, it can fix a pot that does not drain outside the usual repotting season.Open the glossary, root ball and all, into a training potA plain, inexpensive container, usually plastic, used while a tree grows and develops rather than for display. It drains well and is roomier than a bonsai pot, which makes it a practical next home for a tree whose current pot does not drain.Open the glossary, so an old, peat-rich root ball now sits inside a ring of coarse fresh mix (Course 02, Lesson 7). Since January, its owner has judged it by a fingertip and a chopstick near the rim, the easiest spots to reach under the foliage.
This morning, with the foliage lifted aside, the surface is pale and looks dry. A probe moisture meterA meter with a probe that is pushed into the mix; its needle or display shows an electrical property of the mix, not water directly. Dissolved salts and how well the probe touches the particles sway the reading as well as moisture, so cheap meters are often unreliable, especially in coarse bonsai mixes, and a chopstick and the pot's weight tell you more.Open the glossary a friend lent reads “DRY” near the rim, yet a chopstick left a few minutes in the same spot comes out damp and cool on the lower half. The pot feels lighter than after its last watering, but not light. Then the owner tries a new spot, partway between trunk and rim, in the old root ball itself: there the chopstick comes out dry and pale along its whole length.
Five readings from one pot, and they do not agree. Should the owner water now, or wait? This lesson goes below the surface: what each check reads and where it can fool you, how to put checks together, and where to check in a root ball that dries unevenly. If you need to decide about a tree of your own today, read the next section, then the two checks at the end of this lesson, which work for any pot that drains.
What you are checking for
The question is how much water the root zone, the substrateThe material that fills a container and surrounds a tree's roots, such as a mix of mineral grit, bark, or soil. Its job is to anchor the roots and to hold water, mineral nutrients, and air in a balance the roots can use.Open the glossary where the roots are, still holds. Course 01, Lesson 2 introduced the basic checks; this lesson takes each one further, including what it cannot tell you.
This course uses six words for how moist a root zone is, from driest to wettest:
- Bone dry: pale and loose, or shrunk away from the pot wall. fine rootOne of the many thin, branching roots, often pale when young, that do most of a tree's absorbing of water and mineral nutrients. Fine roots live a relatively short time and are constantly replaced, so they depend on a root zone that holds both water and air.Open the glossary are dying, and a peat-rich mix sheds water.
- Dry: dry all the way down. It is late, and the tree needs water now.
- Drying: dry through most of its depth, with only the bottom still faintly damp, and the pot feels light. For most trees in active growth, this is the usual moment a check says water.
- Moist: damp from partway down to the bottom, with water in the small pore spaceThe gaps between particles in soil or substrate, which hold water, air, or both. Large pores usually drain and refill with air after watering while small pores hold water, so the mix of pore sizes sets how wet and how airy a root zone stays.Open the glossary and air in the large ones. This is the healthy middle.
- Wet: just watered and draining, which is normal for a short time.
- saturatedDescribes soil or substrate whose pore spaces are completely filled with water, leaving little or no air. Brief saturation right after watering is normal in a pot that drains; saturation that lasts starves roots of oxygen.Open the glossary: every pore full of water, with no air. It is normal only briefly, right after watering in a pot that drains, and harmful when it lasts.
Every check ends in one of three decisions:
- Water thoroughly now. Wet the whole root ball, slowly, until water runs from the drainage holeAn opening in the bottom of a container that lets extra water run out after watering. Without one, water collects at the bottom and the substrate there stays saturated, so roots run short of air; every pot a bonsai lives in needs at least one.Open the glossary, then confirm that it soaked in. That is a thorough wateringWater applied evenly across the whole surface, slowly enough to soak in, until it runs from the drainage holes, and then confirmed by a check that the root ball wetted through. It usually takes two or three passes a minute or two apart. Water at the holes alone shows only that water reached the bottom, not that the roots got it.Open the glossary, and Lesson 3 shows how.
- Not yet: check again later. Do not water now; look again this evening or tomorrow morning.
- Investigate before watering. This is for three situations: the tree and the root zone disagree (a tree that droops, dulls, or yellows in a pot that checks Moist or wetter), the pot has been standing in water, or it stays Wet far longer than the weather explains. It means looking closer, at the middle of the root ball, the holes, underneath the pot, the smell, and what changed recently, before you decide. It never means watering by default (Lesson 4).
For an established tree in active growth, the routine is a morning check, not a morning watering: water only when the check says the root zone is drying, wet it thoroughly, and confirm that it soaked through and drained (Lesson 1).
Why the surface misleads
The surface is the first part of a pot to lose water. Sun, warm air, and wind dry the top layer, so it can look dry for a day or more over a root zone that is still moist, while the wettest layer is usually at the bottom (Course 04, Soil, Substrates, and the Root Environment, explains why). It can mislead the other way too: a light shower, or mist drifting down from the leaves, can darken the top layer over a root zone that is drying. A glance reads only the top few millimeters.
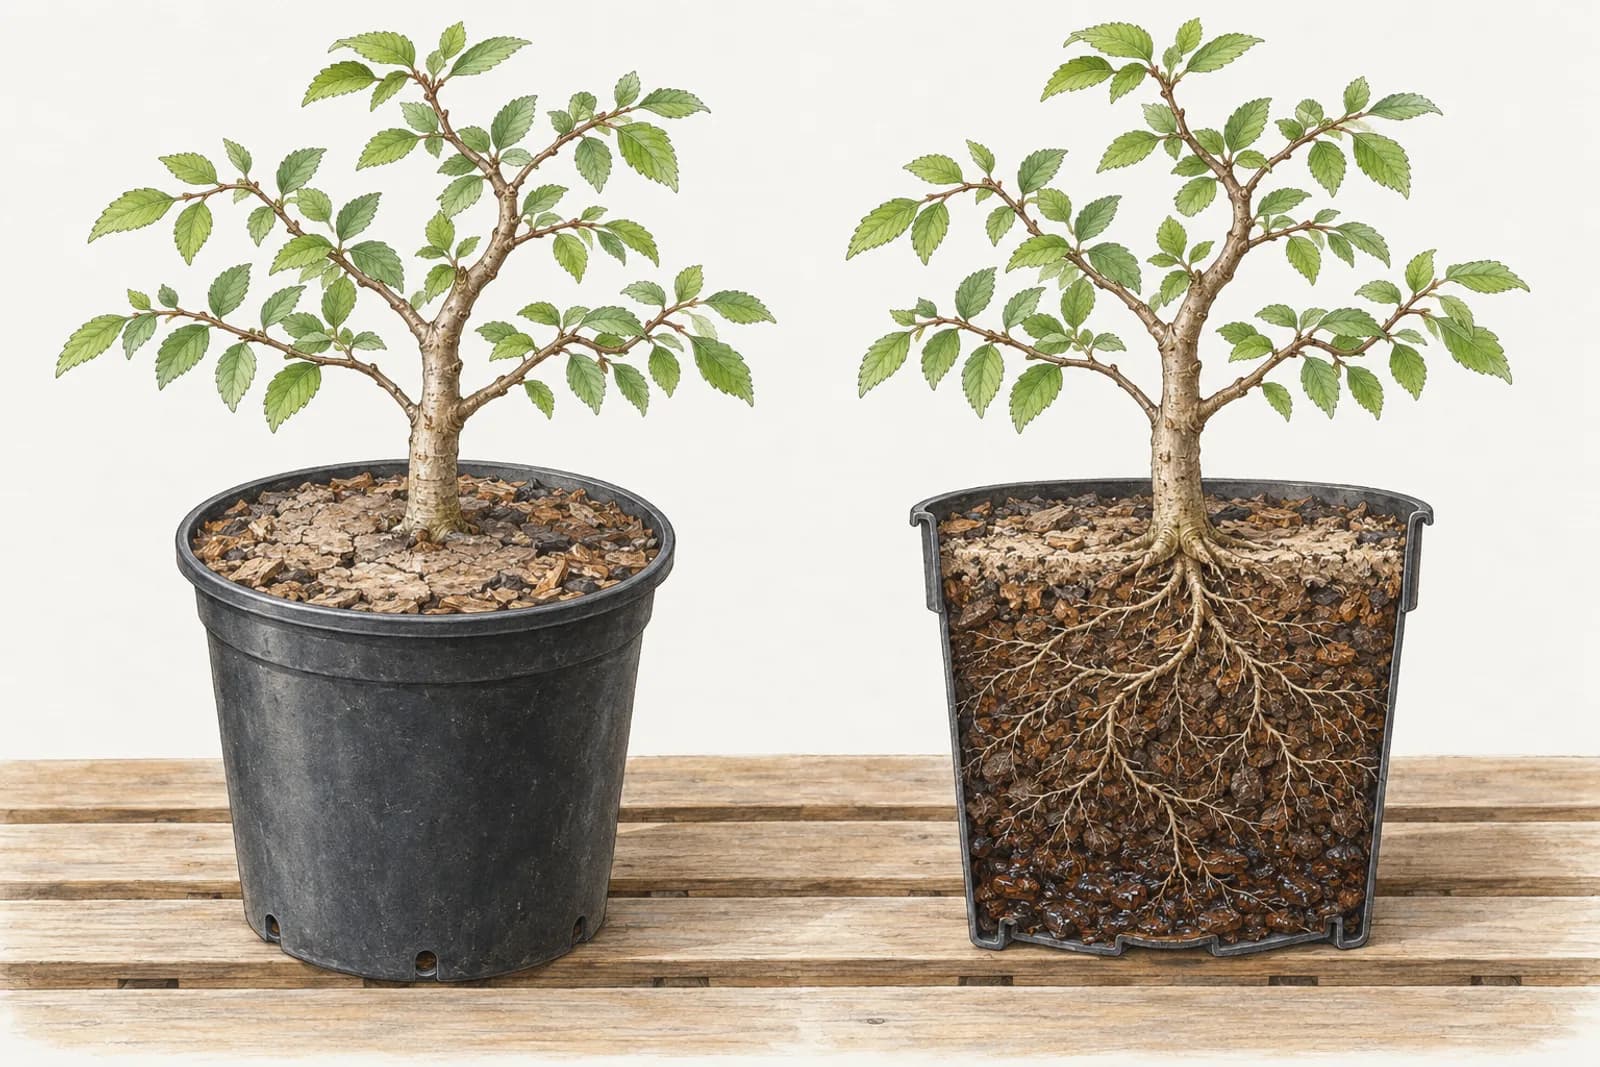
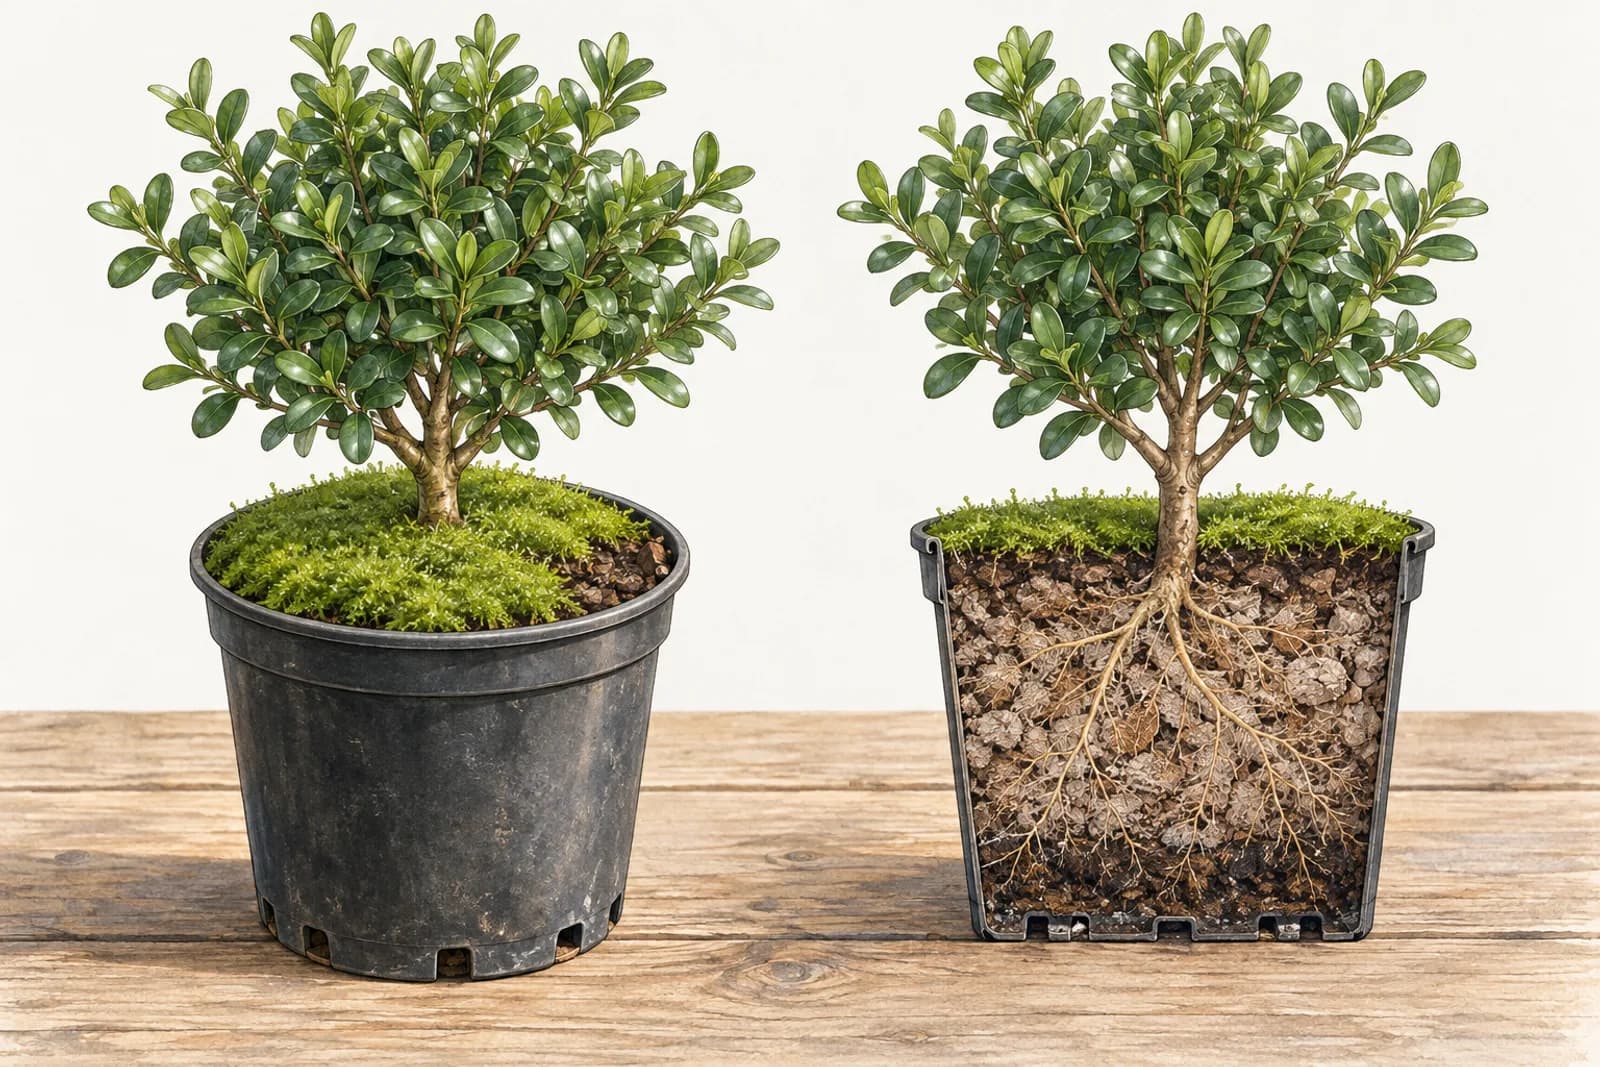
Often you cannot see the mix at all. Moss can stay green over a root zone that has dried below it (Course 01, Lesson 2). A top dressingA thin layer spread over the surface of a pot, such as grit, fine gravel, or moss, that keeps the surface from washing out under watering and gives it a tidy look. It also hides the mix beneath it, so the surface becomes a poor guide to moisture, and checks have to go below it.Open the glossary is a thin layer of grit, fine gravel, or moss spread over the mix to keep the surface from washing out. It hides the mix too, and so does loose decorative gravel: brush a little aside, or check beside it. A spreading canopy like the gift juniper's hides the surface as well, so lift the foliage aside before you look, touch, or push in a chopstick.
Two setups hide the root zone from most checks, and both are common on trees sold as gifts. A crust of pebbles glued over the surface sheds water and hides the mix, so there is nothing to see or touch, and a chopstick can go in only through the gap at the rim (Course 02, Lesson 7). A pot with no drainage hole keeps water standing in its bottom, out of sight, so the surface can look thirsty, and a chopstick that stops short of the bottom can come out nearly dry, while the roots below sit in water (Course 02, Lesson 7). Fix the pot first: if it has no hole, slip the root ball into a pot that drains, then soak the crust off. Until then, the lift and the tilt still help: a heavy pot, or water that trickles out when you tilt it over a sink, means add no more.
The checks, one by one
Seven checks are worth knowing: the surface, a fingertip, a chopstick, the lift, the drainage holes, a probe meter, and the leaves. Each reads something real, and each has a blind spot.
Look at the surface
Lift any foliage aside and look at the color and texture: damp mix is darker, dry mix paler and looser. A surface still dark the morning after a watering usually goes with a moist root zone, and a pale surface shrinking away from the pot wall warns that the whole root ball may be dry. Neither settles it, so let the surface start a check, never end one.
Feel with a fingertip
Push a fingertip into the mix near the rim, down to the first knuckle, and feel for coolness and damp. Near the rim you touch only mix, away from surface roots and the trunk, so the check does no harm; do not dig. A fingertip reads only the top few centimeters at one spot, so where the edge of a pot dries at a different rate from the middle, it reads only the edge.
Read a chopstick
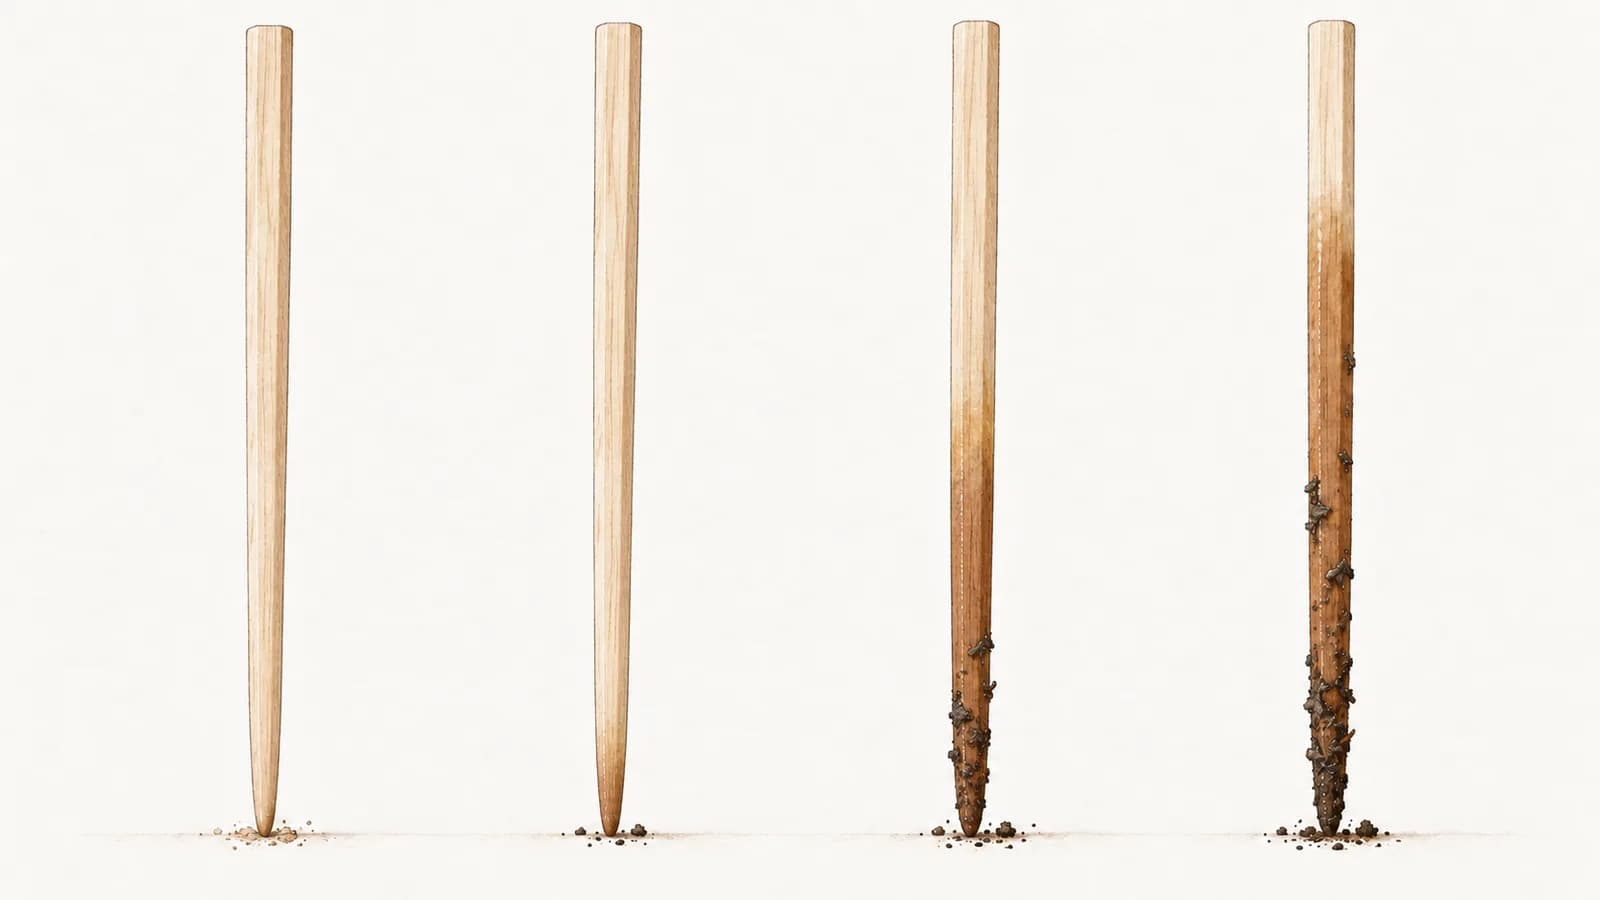
The chopstick is the check that reaches the roots. Use a plain, unvarnished wooden chopstick or skewer, because varnish stops the wood from taking up water. Push it gently and deep into the root zone, partway between trunk and rim, and if it meets a root, move it a little rather than force it. Leave it a few minutes so the wood can draw in moisture, then pull it out and read it along its whole length, from the tip up to where it left the surface:
- Dry and pale along its whole length: the root zone is dry, or bone dry.
- Dry, with only the tip faintly damp: drying. Most of the depth has dried.
- Damp and cool on the lower half: moist.
- Dark, cool, and wet along its whole length: wet, as after a watering, or saturated if it stays that way.
Check a surprising reading in a second spot, on the other side of the trunk, and let a damp chopstick dry before you use it again, so yesterday's water does not color today's reading. A chopstick reads one spot, so in a root ball that dries unevenly, where you push it decides what it tells you.
Lift the pot
Water is heavy, and little else in a pot changes from day to day, so weight shows how much water the whole pot holds. Judging moisture this way is the lift testJudging how much water a pot holds by lifting it and comparing its weight with how it felt right after a thorough watering and when it was dry enough to need water. It has to be learned for each pot, works best where water is a large share of the weight, and shows how much water the pot holds, not where it is.Open the glossary, and it has to be learned for each pot. Lift the pot right after a thorough watering, once the drips stop: that is your heavy reference. Lift it again on a morning when the chopstick comes out dry with only the tip faintly damp: that is your light reference, how the pot feels when it is dry enough to need water. If you did the activity at the end of Lesson 1, “Lift one pot morning and evening,” its first lift is already your heavy reference. Use the same grip each time, so you compare the pot and not your arms, and tilt one edge of a pot too heavy to lift. Against those two references, a lift reads one of four ways, from lightest to heaviest:
- Light: at or below your light reference. Drying or drier when the chopstick agrees, and time to water.
- Lighter than after watering: between the two references. Moist or drying: the lift cannot settle it, so let the chopstick decide.
- Heavy: a little below your heavy reference. Moist.
- Heavy, as if just watered: at your heavy reference. Wet.
The lift cannot say where the water is: it weighs the whole pot, so it cannot tell an evenly moist pot from one with a damp part and a dry part. It also tells you little where water is a small share of the weight, as in a small, shallow bonsai pot. Its strength is speed: after a move, the pot's weight is the quickest way to learn how fast it now dries (Course 02, Lesson 3).
Tilt to see the drainage holes
Tilt the pot and look at the mix in the drainage holes, then touch it. This is the bottom of the pot, usually the wettest layer, so in a pot of one even mix it answers one question well: if even the mix at the holes is dry, the rest of the root zone is drier still, and it needs water now. A damp bottom says little about the middle and the top. And where a root ball sits on a layer of different mix, as after slip-potting, the holes read that layer, not the root ball above it. While you are there, look for white root tipThe growing end of a root, made up of the root cap, the dividing cells behind it, and short zones where new cells lengthen and mature. Active tips are usually pale or white and show where a root is extending into fresh substrate.Open the glossary, a sign of growing roots (Course 01, Lesson 2), and for water standing in a tray or cachepotA decorative outer pot, usually without a drainage hole, that holds a plainer pot inside it. Water that drains from the inner pot collects in it, so it has to be emptied after every watering or rain, or the bottom of the root ball sits in water.Open the glossary, which calls for investigating before the pot gets any more water (Course 02, Lesson 7).
Why a probe meter misleads
A probe moisture meter looks like the answer, but it does not measure water directly. It reads an electrical property of the mix around its tip, which responds to soluble saltsDissolved minerals, from fertilizer and from tap water, that can accumulate in a container's substrate as water evaporates. A high concentration makes it harder for roots to take up water and can damage them. Buildup can leave a white crust on the pot or surface, though hard tap water alone can leave a similar crust, so a crust by itself does not show that roots are harmed.Open the glossary in the mix and to how well the probe touches the particles, as well as to water (Course 02, Lesson 7). In a coarse bonsai mix, with large air-filled pores between the grains, the probe touches little, so damp mix can read dry; in a mix that has been fed, salts can make a drying mix read moist. Near the gift juniper's rim, the meter read “DRY” where a chopstick came out damp.
Go deeper · optional, not assessedWhat a cheap meter actually measures
Many inexpensive analog meters need no battery: the tip carries two different metals that act like a weak battery in moist mix, and the needle shows the small current that dissolved salts let flow between them. More salts, or more contact with wet particles, means more current, so a recently fed pot can read wetter than it is and a coarse, airy mix drier. Research sensors follow water more closely, but even they must be calibrated for each substrate.
Look at the leaves
Leaves are worth a look at every check, but they are the slowest signal. A broadleafA flowering tree or shrub with flat, typically broad leaves, such as a maple, elm, oak, or ficus, as distinct from a conifer. Broadleaves can be evergreen or deciduous, tropical or temperate, so the label alone does not tell you how to care for one.Open the glossary tree such as a trident maple droops when water runs short, but only after the root zone has been short for a while. coniferA tree or shrub that bears seeds in cones, which are berrylike in junipers, instead of in flowers and fruits, and usually has needle-like or scale-like leaves. Most conifers are evergreen, but larches and a few others drop their needles each autumn.Open the glossary such as junipers barely droop: a thirsty juniper may show only dull, grayish foliage (Course 01, Lesson 8), and it can stay green for weeks after its root ball has dried and its fine roots have died (Course 01, Lesson 14). Waiting for the leaves means waiting too long. And a droop does not always mean dry: wiltingDrooping of leaves or soft shoots when their cells lose turgor because water loss has outpaced uptake. It can come from a dry root zone, but also from damaged or reduced roots, very high demand, or blocked xylem, even when the substrate is wet.Open the glossary in a pot that checks Moist or wetter calls for investigating, not water (Lesson 4).
Practice check · not scored
Putting checks together
No single check is enough. Two checks that read different things, such as the lift, which weighs the whole pot, and the chopstick, which reaches the root zone at one spot, cover most of each other's blind spots. When they agree, act. When they disagree, add a check, such as a second chopstick spot or the drainage holes, rather than pick the answer you would prefer. Read together, they point to a moisture level and a decision:
- The chopstick comes out dark, cool, and wet along its whole length, or the pot feels heavy, as if just watered: wet. Not yet: check again later. If it stays that way for days in warm weather, or the tree droops, the decision becomes Investigate before watering.
- The chopstick is damp and cool on the lower half, or the pot feels heavy: moist. Not yet: check again tomorrow morning, or this afternoon on a hot, windy day.
- The pot feels lighter than after watering: moist or drying. The lift cannot settle it, and the chopstick decides.
- The chopstick is dry, with only the tip faintly damp, and the pot feels light: drying. Water thoroughly now.
- The chopstick is dry and pale along its whole length, and the pot feels light: dry, or bone dry. Water thoroughly now: you are late. If the root ball has shrunk from the pot wall, water runs straight down the gap: rewet it slowly in several passes, or stand the pot in a basin of water up to the surface of the mix until the root ball is wet through, usually 10 to 30 minutes, up to an hour for a bone-dry, peat-rich root ball, then let it drain (immersion wateringStanding a pot in a basin of water up to the surface of the mix until the root ball is wet through, then lifting it out to drain fully. Rising bubbles show air leaving; when they stop, check the core with a chopstick, because a water-repellent core can stop bubbling before it is wet. Allow 10 to 30 minutes, up to an hour for a bone-dry, peat-rich root ball, and never more than a few hours: it is never a way to leave a pot standing in water.Open the glossary, Lesson 3).
The surface, the fingertip, and the leaves add context, and a probe meter is the last reading to trust. Sometimes the disagreement is the finding: when a chopstick says moist in one spot and dry in another, no check is broken. The root ball is drying unevenly, and the question becomes which part most of the roots draw on.
Practice check · not scored
The lift takes practice. In Learn a pot's weight, a gauge stands in for your hands. Start with the Nursery pot, then press Lift just after watering and Lift when dry: two pencil marks appear on the gauge, labeled “Just watered” and “Dry.” They stand for your heavy and light references; on your own pot, take the light one on the morning the chopstick says water, before the root zone is truly Dry. The Large training box is too heavy to lift, so there the buttons read Tilt just after watering and Tilt when dry. Then judge three mornings for each pot:
- Read when the pot was last watered and the weather since, then press Lift (Tilt one edge on the box) and see where the needle settles against your marks.
- Make your call from the lift alone, while the pot is still closed: choose Water thoroughly now, Not yet: check again later, or Can't tell from the lift: use the chopstick, then press Make the call. Only then does the lift appear in words, with the pot opened and a chopstick to confirm it.
- Press Next morning, and after a pot's third morning, Next pot: Terracotta training pot, and so on through the Shallow bonsai pot and the Large training box. The exercise finishes when all four pots are judged.
Exercise
Learn a pot's weight
The case
Root-zone moisture: Moist
The nursery juniper · Top tier of the slatted shelf, west balcony
Round black plastic nursery pot, about 20 cm (8 in) across
- Your pencil marks
- This morning's reading, after your call
Step 1 · Set your marks
Learn this pot's weight first
Lift it right after a thorough watering and again when it is dry. Each lift pencils a mark on the gauge: your own references for this pot, and no one else's.
What the weight is made of
- Pot
- Mix and roots
- Tree
- Water
Water is a large share of the weight. Only the water changes, so the gap between the two bars is the difference your hands feel.
Text description
An exercise in the lift test. A pot stands on its support with its tree. When you lift it, two gloved hands reach in, hook their fingers over the rim, and raise it; the large training box is too heavy, so one hand takes the rim and the other the bottom corner, and they tilt one edge instead. Beside or below the pot, a wordless spring gauge stands in for the feel of the weight: a red needle rests on a stop pin, swings when the pot is lifted, overshoots, and settles. The heavier the pot, the farther right it settles. The gauge is set to each pot's own weight, so your Just watered mark always sits in the same place and only the Dry mark moves. The gauge has no numbers and no words, only your own two pencil marks, each labeled on a strip of tape: Just watered and Dry. When both are set, a bracket between them says how far apart they sit on that pot. On the shallow bonsai pot and the training box, a faint band around the lifted needle shows that the hands feel the weight only roughly. After each call, a small red marker keeps that morning's reading on the gauge.
While you set your marks, the pot is drawn cut open so you can see the mix inside, with its root-zone moisture named beside it; the watering mark shows a can sweeping the surface from rim to rim and water soaking down, and the dry mark shows a few days passing. While you judge a morning, the pot is closed, so the lift is all you have. After your call it opens again, with a chopstick pushed in partway between trunk and rim. The cutaway draws the six moisture levels so that color is never the only cue: Bone dry: pale, with crack lines; Dry: pale; Drying: pale over a faint damp band at the bottom; Moist: light blue with air dots; Wet: blue with sparse air dots; Saturated: deep blue under a solid water line, no air dots.
Two bars show what the pot's weight is made of, just after watering and when dry: the pot, the mix and roots, the tree, and the water. Only the water changes, so the gap between the bars is the difference your hands feel.
- Nursery pot: The nursery juniper. Top tier of the slatted shelf, west balcony. Round black plastic nursery pot, about 20 cm (8 in) across. Water is a large share of the weight. Its two marks sit far apart. Its three mornings: 1, last thorough watering yesterday at midday, then a cool, breezy afternoon; 2, last thorough watering two mornings ago, then a hot, sunny day, then a hot, windy one; 3, last thorough watering three mornings ago, then a cool, cloudy day, then two cool, breezy ones.
- Terracotta training pot: The trident maple. Low bench against the back wall, west balcony. Plain unglazed terracotta training pot, about 25 cm (10 in) across. Water is a fair share of the weight. Its two marks sit a fair way apart. Its three mornings: 1, last thorough watering two mornings ago, then two mild, bright days; 2, last thorough watering yesterday evening, then a mild, clear night; 3, last thorough watering yesterday, late in the morning, then a cool, cloudy day.
- Shallow bonsai pot: A small juniper, an instructional example. An outdoor bench in full sun. Small, shallow bonsai pot, about 17 cm (7 in) across. Water is a small share of the weight. Its two marks sit close together. Its three mornings: 1, last thorough watering yesterday, early in the afternoon, then a mild, bright afternoon; 2, last thorough watering yesterday morning, then a hot, windy day; 3, last thorough watering yesterday at midday, then a hot, sunny afternoon.
- Large training box: A large broadleaf tree, an instructional example. On the paving of a sunny patio. Large wooden training box, about 40 cm (16 in) across. Water is a small share of the weight. Its two marks sit close together. It is tilted, not lifted. Its three mornings: 1, last thorough watering yesterday morning, then a steady day of still rain; 2, last thorough watering two mornings ago, then a cool, cloudy day, then a mild, bright one; 3, last thorough watering three mornings ago, then three hot, sunny days.
First set two marks on the chosen pot: Lift just after watering pencils the Just watered mark, and Lift when dry pencils the Dry mark (Tilt just after watering and Tilt when dry on the box). Then judge three mornings. Press Lift (Tilt one edge on the box), and the live region says where the needle settles relative to your marks. For every morning the same three calls are offered: Water thoroughly now; Not yet: check again later; or Can't tell from the lift: use the chopstick. Press Make the call. Each call gets feedback; then the lift word appears (one of Light; Lighter than after watering; Heavy; Heavy, as if just watered), with the chopstick's reading, the root-zone moisture, and what to do. A streak counts right calls in a row, and each pot's tab shows its progress. Pressing Escape, or pressing a calibration button again, skips a scene that is playing.
The exercise finishes when all four pots are judged, with a card on when the lift test works best that sets each pot's two marks side by side.
The lift was clearest where water made up a large share of the weight: in the Nursery pot, the nursery juniper's light plastic pot, the marks sat far apart, and the trident's heavier Terracotta training pot, its marks a fair way apart, still read clearly on every morning. In the Shallow bonsai pot the marks sat close together, so two of its three mornings landed between them, where the lift says only Lighter than after watering. That can mean Moist or Drying, and there the chopstick decided, once to wait and once to water. The Large training box could only be tilted, which feels only part of the weight, so it left most of the work to the chopstick and the drainage holes.
When the lift said light, a chopstick still confirmed it before you poured; when it said heavy, you could wait without one. In every pot the lift showed how much water it held, never where, and the marks held only for the pot they were learned on.
Uneven root balls
Most pots of one even mix dry from the top down and fairly evenly from side to side, so one chopstick spot partway between trunk and rim is a fair guide to the root zone, with a second spot to confirm a surprising reading. Some pots do not dry that way, and the gift juniper's is one.
Predict first
The chopstick in the old root ball, and it says water thoroughly now, slowly and aimed at the core, because dried peat sheds water. Until about April, nearly all the juniper's roots are in the old root ball, so that is where the tree has drawn its water, while the ring of fresh mix, with few roots yet, stays damp. Every reading the owner had trusted came from that ring, and the lift, which weighs the whole pot, could not tell a damp ring from a dry core. The meter's “DRY” pointed the right way for the core, but only because a coarse mix fooled it. The cutaway below shows both zones.
The gift juniper's two zones
The old root ball keeps the shape of the shallow oval pot it came from, about a quarter as deep as it is long, so its dark, fine, peat-rich mix fills most of the round training pot, about 22 cm (9 in) across and noticeably wider than deep. A thin layer of coarse fresh mix lies under it, and a ring of the same mix, a finger's width or two wide, runs around it, wider at the sides.
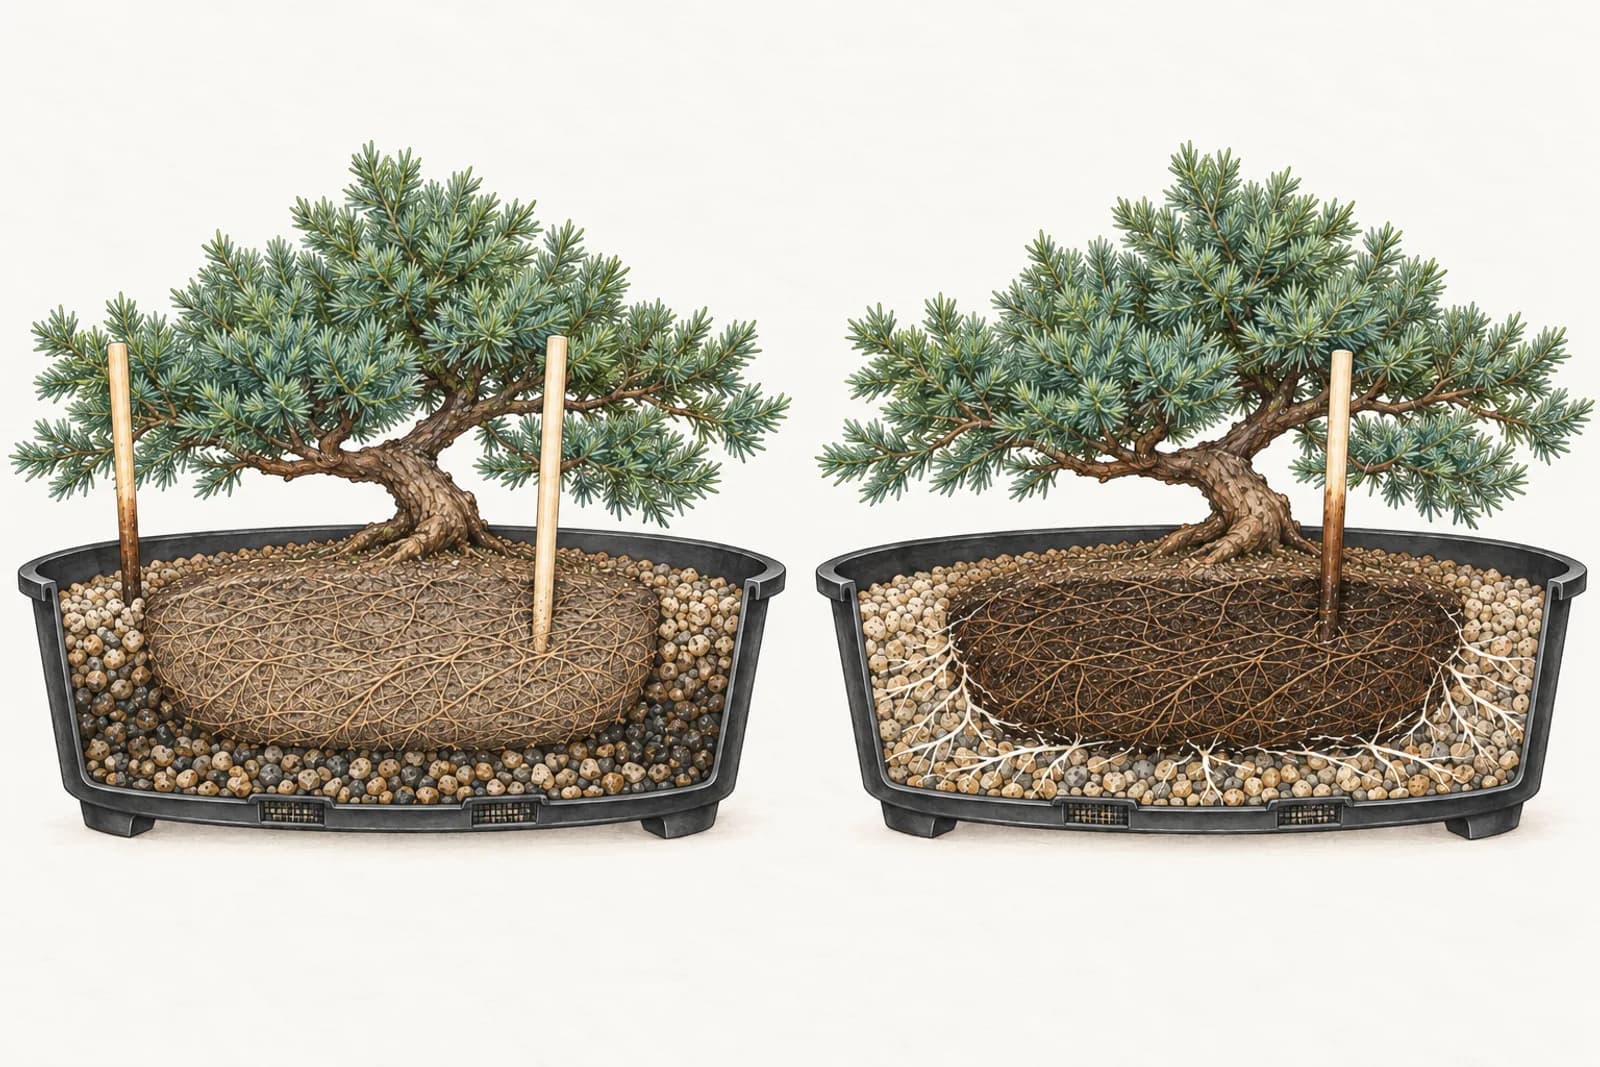
Right after a thorough watering, the peat-rich core holds far more water than the coarse ring, which drains within minutes to moist. Then the two zones lose water by different routes. Until about April, nearly all the roots are in the core, and they draw it down. The ring, with few roots yet, loses water only from its narrow strip of surface: the plastic wall lets none through, and once drained, the ring passes little water sideways into the core. So in late winter and spring, on sunny, breezy days, the core can dry while the lower ring stays damp. A peat-rich core that dries past a point also sheds water, a behavior called water repellencyThe way some organic mixes, especially peat-rich ones, shed water after drying out: water beads on them and runs off or past instead of soaking in, until they slowly rewet. Small, slow amounts aimed at the dry part, or immersion, rewet them, while a fast pour runs straight past.Open the glossary, and the next watering can then run down the ring and out of the holes without wetting the core: a kind of channelingWater running down a few easy paths, such as a gap at the pot wall, a crack, or the edges of a dry, water-repellent core, and out of the drainage holes without wetting most of the root ball. First drips within seconds from a pot that was light suggest it; a pot still barely heavier afterward, or a core that is still dry, confirms it.Open the glossary that Lesson 3 shows how to spot and fix.
Through spring and early summer, new roots grow out into the ring, and the pattern flips: they spend the ring's small store first, so the ring dries ahead of the core, while the core's larger store keeps it moist longer, most of all in cool weather. The drainage holes, under the coarse bottom layer, read that layer rather than the core: in spring they can be damp under a dry core, and in summer dry under a moist one.
The rule does not flip. The core still holds most of the roots and most of the water, so in both seasons the chopstick goes into the old core, partway between trunk and rim, and its reading decides, as Course 02, Lesson 7 advised. A dry core needs water now, poured slowly and aimed at the core, even when the pot feels only a little lighter than after watering. A ring that dries ahead of a still-moist core is no reason to water: watering by the ring would keep the core wet and short of air (Lesson 4). One even mix throughout is the lasting fix, at a later repotting (Course 11, Repotting and Root Development).
Root-filled pots and fresh mix
A pot full of roots, circling the wall and matting at the bottom, is called root-boundDescribes a container plant whose roots fill the pot, circling the walls and matting at the bottom. A mildly root-bound nursery tree is common and often healthy. A badly root-bound one dries out quickly, and circling roots are dealt with at repotting.Open the glossary. It dries fast, because roots draw on every part of it and take up room that would otherwise hold water. A dense mass of roots can be hard to push a chopstick into, and water may run down its sides rather than soak in (Lesson 3), so lean on the lift and check it more often, in summer heat sometimes twice a day.
The opposite is fresh mix that no roots have reached yet, after slip-potting or in a pot much bigger than its roots. Nothing draws on it from inside, so it dries slowly, mostly from its surface (and, in an unglazed pot, through the wall), and a check made in it can say wait while the roots beside it run dry. That is one reason a much bigger pot is not kinder to a tree (Course 02, Lesson 7). Wherever a root ball dries unevenly, check where most of the roots are.
Practice check · not scored
Six pots, checked below the surface
In What is under the surface?, each pot's cutaway is hidden under a cover, so you find out what is inside the way you would at home: with checks. Start with the New juniper, then use any checks, in any order: Surface, Fingertip, Chopstick, Lift, Drainage holes, Probe meter, and Leaves. Each one adds a card to the Evidence tray.
- Use at least two checks that read different things before you decide. Chopstick asks where to push it in: Near the rim, Partway between trunk and rim, or Close to the trunk.
- Make your call while the cover is still on: under Decide, choose Water thoroughly now, Not yet: check again later, or Investigate before watering, then press Reveal to peel off the cover and see the cutaway and how your call compares. A right call that rested on one check, or on checks that pointed elsewhere, is marked a lucky call.
- Answer Which check would have misled you here?, trying again until you find one, then press Next case: Backyard trident, and so on through the six. The exercise finishes when all six cases are solved and a blind spot is found in each, and a case file sums up each check's blind spot.
Exercise
What is under the surface?
Case 1 of 6 · The small backyard · Instructional example
The new juniper, a June morning
Juniperus procumbens ‘Nana’
Nursery stock bought in mid-May, in a 4 L (1 gallon) black nursery pot on the slatted bench at the patio's lawn edge: full sun, with the pot's sunny side shaded. Its spreading foliage hides most of the surface.
Checks
Use at least two that read different things.
Evidence
No cards yet
Each check adds a card here with its reading.
Decide
Use at least one check first. Two that read different things are better.
Case file
Solve all six cases and find a blind spot in each to fill it in. 0 of 6 solved · 0 blind spots found.
Text description
Six pots, one at a time, each an instructional example from the course's growing places. Each pot is drawn from the side with its tree, standing where it lives, and its inside is hidden under an opaque cover: a sticker printed with the outside of the pot. The checks act on the drawing: a gloved hand lifts a juniper's foliage aside, a finger presses in near the rim to the first knuckle, a chopstick slides in at the chosen spot, waits a few minutes on a small clock, and slides out, two hands lift the pot, the pot tilts to show its drainage holes, a probe meter's needle swings, or a red ring marks the foliage and a round close-up shows the leaves. A close-up under the drawing shows each reading, and the same words go on a card in the Evidence tray. Anything visible without a check, such as the color of the foliage, is also given by the Leaves check.
The seven checks, in this order, are Surface, Fingertip, Chopstick, Lift, Drainage holes, Probe meter, Leaves. Chopstick first asks where to push it in: Near the rim, Partway between trunk and rim, Close to the trunk. A chopstick comes out with one of four readings: Dry and pale along its whole length; Dry, with only the tip faintly damp; Damp and cool on the lower half; Dark, cool, and wet along its whole length. A lifted pot feels Light; Lighter than after watering; Heavy; Heavy, as if just watered. The probe meter's dial reads DRY, MOIST, or WET, with a note on what it really reads.
Under Decide, every pot offers the same three calls: Water thoroughly now; Not yet: check again later; Investigate before watering. Reveal peels the cover back like a sticker to show the cutaway, grades the call with feedback, and counts the checks used. A right call that rests on one check, or on checks that pointed elsewhere, is marked lucky, with a nudge toward a second check. In the cutaway, roots are pale lines and the mix shows its moisture level: Bone dry: pale, with crack lines; Dry: pale; Drying: pale over a faint damp band at the bottom; Moist: light blue with air dots; Wet: blue with sparse air dots; Saturated: deep blue under a solid water line, no air dots. Then a question asks which of the seven checks would have misled you in that pot, and each answer gets feedback until a blind spot is found. A case is solved once it is revealed. The exercise finishes when all six are solved and a blind spot is found in each, with a case file that lists every check's blind spot.
- Case 1: The new juniper, a June morning (Juniperus procumbens ‘Nana’). The small backyard. Nursery stock bought in mid-May, in a 4 L (1 gallon) black nursery pot on the slatted bench at the patio's lawn edge: full sun, with the pot's sunny side shaded. Its spreading foliage hides most of the surface.
- Case 2: The backyard trident maple, a warm morning in late June (Acer buergerianum). The small backyard. Bought in leaf in mid-April last year, in its black plastic nursery pot about 18 cm (7 in) across, on the bench in the western third of the yard: morning sun, then afternoon shade from the neighbor's maple. The patch of moss on its surface came with it from the nursery.
- Case 3: The nursery juniper, a July morning after a light shower in the night (Juniperus procumbens ‘Nana’). The west balcony. In its round black plastic nursery pot about 20 cm (8 in) across, with dark, bark-based nursery mix, on the top tier of the slatted shelf in the open middle of the balcony. Its spreading foliage hides most of the surface.
- Case 4: The gift juniper, a late March morning (probably Juniperus procumbens ‘Nana’, not confirmed). The west balcony. On the balcony's slatted shelf, beside the nursery juniper, in a round black plastic training pot about 22 cm (9 in) across and wider than deep. In December it was slipped into this pot root ball and all, so an old, peat-rich root ball sits inside a ring of coarse fresh mix. Its foliage hides most of the surface.
- Case 5: The balcony trident maple, a July morning before a hot day (Acer buergerianum). The west balcony. In a plain unglazed terracotta training pot about 25 cm (10 in) across, with free-draining mix, on a low bench against the back wall under the overhang, standing on a grid over a tray. It is in the rain shadow, so it is watered by hand.
- Case 6: A juniper in a tray, an early June morning after two warm days (Juniperus procumbens ‘Nana’). Another garden. A spreading juniper in a black plastic nursery pot about 20 cm (8 in) across, standing in a shallow tray on a sunny patio, with water standing in the tray.
In four of the six pots, the surface pointed the wrong way: pale over a moist root zone, green moss over a dry one, damp after a light shower over one that was drying, and pale, dry-looking mix in the trident's terracotta pot the day after a thorough watering. The probe meter misled three times: salts in the mix made it read “MOIST” in the mossy, dry pot, and coarse mix made it read “DRY” in damp or moist mix. Each case was settled by two checks that read different things and agreed, or by a third when two disagreed; a right call made on one check, or on checks that pointed elsewhere, was only a lucky call.
The pale crust over a moist root zone and the trident watered the day before both called for Not yet: check again later. In the gift juniper's pot the spot mattered: the fingertip, the chopstick near the rim, and the drainage holes all read the damp ring, the lift could not tell ring from core, and only a chopstick in the old core found the dry root ball, so the call was Water thoroughly now, slowly and aimed at the core. The juniper left in a full tray was the one case for Investigate before watering: a pot as heavy as if just watered, water running from the holes into the full tray, and dulling needles. Every check, even the chopstick in the wrong spot, misled in at least one pot, which is why no single check is enough.
A one-minute morning round
A check only works if it happens, so make it short enough to do every morning. For each pot, it takes about a minute of hands-on time:
- Look at the leaves and the surface, lifting any foliage aside, and glance at the tray or cover pot for standing water.
- Lift the pot, or tilt one edge, and compare it with your two references.
- Push in the chopstick at the pot's checking spot, partway between trunk and rim, or into the old core in a two-zone pot, and leave it a few minutes.
- Read the chopstick along its length, and decide: water thoroughly now, not yet, or investigate before watering.
- Write one line: the date, the weather, the readings in words, and the decision. A few weeks of these lines make a watering logA dated record of each check of a tree's root zone, usually one short line per pot: the weather, what each check found, the decision, and the reason for it. Read over weeks, it shows how fast each pot dries in different weather, whether the decisions worked, and patterns no single check can show, such as a pot that keeps drying fast even as the weather cools.Open the glossary that shows how fast each pot dries in each kind of weather (Lesson 7).
With several pots, do the first three steps for each pot in turn, then read the chopsticks in the same order, so each has had its few minutes. Mark each pot's checking spot, for example with a dot of paint on the rim, so every reading comes from the same place. This is the arrival-day check (Course 02, Lesson 8) made into a habit. On hot, windy summer days, add an afternoon round, because a small pot can dry out in a single day (Course 02, Lesson 1).
Two checks, then a decision
The bonsai decision
Two checks before every watering
Starting point
Each morning, before any watering:
- Lift the pot, then push a chopstick in partway between trunk and rim, into the old core if the root ball has two zones, and read it after a few minutes.
- Water thoroughly when the pot feels light and the chopstick comes out dry with only its tip faintly damp, or drier. Pour slowly through a fine watering roseThe cap pierced with many small holes on the end of a watering can's spout, which breaks the flow into a gentle shower. A fine rose wets a pot's whole surface evenly without washing the substrate away or cutting channels through it.Open the glossary, in two or three passes, until water runs from the holes; Lesson 3 shows how to confirm that it wetted through.
- Wait, and check again tomorrow morning, or sooner on a hot, windy day, when the chopstick comes out damp and cool on its lower half, or wetter.
- When the checks disagree, add a check before deciding: a second chopstick spot, or the drainage holes. In a two-zone root ball, the core's chopstick decides: a dry core means water now, slowly and aimed at the core, even if the pot does not yet feel light.
This assumes
- The pot drains: it has holes, and it is not standing in water.
- The tree is established, with no recent root work, and growing or resting as expected for its kind and the season.
- You know how this pot feels just after a thorough watering and when it is dry enough to need water.
- The months in this lesson belong to the course's Northern Hemisphere example climate. In the Southern Hemisphere, swap north and south, and shift the months by half a year.
Change course if
- The tree is new to you, or has just moved. Until you have learned its pot's weight, read the chopstick in two spots, with the drainage holes as a second check, and lift the pot right after its first thorough watering to set your heavy reference. A new place also dries a pot at a new pace, so check it twice a day for the first few days (Lesson 1; Course 02, Lesson 8).
- The pot is very large, or too heavy to lift. Rely on the chopstick, in two spots, and on the drainage holes; tilting one edge gives only a rough sense.
- The pot is tiny or shallow. The lift tells you little, and on a hot day the pot can dry out in hours, so check more often, in the afternoon as well.
- The leaves droop or dull while the pot checks Moist or wetter. This is not a call for water. Investigate before watering, starting with the core, the holes, and underneath the pot (Lesson 4).
- The pot stays wet for days in warm weather, or has been standing in water. Investigate before watering, starting with the drainage and the tray or cover pot (Course 01, Lesson 7).
Back to the question
How can you tell whether a pot needs water when the surface looks dry?
Go below it. The surface dries first and is often hidden or misleading, so it can only start a check. Lift the pot and compare it with your heavy and light references for that pot, then push a chopstick deep into the root zone, partway between trunk and rim, and read it after a few minutes. When the two agree, act: water thoroughly when the pot is light and the chopstick comes out dry with only its tip faintly damp, and wait when it is damp and cool on its lower half. When they disagree, add a check rather than guess. And check where most of the roots are: in a root ball that dries unevenly, such as the gift juniper's, the chopstick in the old core decides.
Key takeaways
- The surface dries first and is often hidden by moss, a top dressing, or foliage, so a dry-looking surface or green moss is never enough evidence on its own.
- Every check has a blind spot: the fingertip reads only the top, the chopstick one spot, the lift how much water but not where, the drainage holes the bottom layer, a cheap probe meter salts and contact as well as water, and the leaves react late.
- Use two checks that read different things, usually the lift and the chopstick. When they agree, act; when they disagree, add a check rather than guess.
- In a root ball that dries unevenly, check where most of the roots are. In the gift juniper's two-zone pot, the chopstick in the old core decides, in spring and in summer.
- A tree that droops or dulls over a root zone that checks Moist or wetter, or a pot that has stood in water, calls for investigating before watering, never for more water by default. A glued crust or a pot with no drainage hole hides the root zone, so fix the pot first.
Optional · not required for completion
Learn one pot's weight, then log it for a week
Choose one pot. Lift it right after its next thorough watering, once the drips stop, and again on the morning its chopstick comes out dry with only the tip faintly damp. Then, for seven days, check it each morning and write one line: the date, the weather, the lift and the chopstick in words, your decision, and why. Keep the log for Lesson 7, which reads records like it. How many days did the pot take to go from heavy to light, and did the weather change that?
No tree? Poke a few holes in the base of a plastic cup, fill it with potting mix, water it until water runs out, let it drain, and lift it. Then leave it in a warm, bright spot, and each day lift it and read a wooden chopstick left a few minutes in the middle against the four readings in this lesson. On which day did the cup start to feel light, and what did the chopstick say?