Course 03 · Lesson 3 of 7 · Check, then water well
How to water effectively
Water running from the drainage holes shows only that water reached the bottom. Learn to water in slow passes across the whole surface, spot water channeling past a dry root ball, rewet one by immersion, and confirm that the whole root ball wetted and drained.
The question
How do you know a watering has actually reached the roots?
By the end of this lesson, you will be able to:
- Explain what a thorough watering does, and choose how to apply it (a fine rose in slow passes, a gentle hose wand, or immersion) for a given pot and root ball.
- Distinguish water channeling past a dry root ball from water that has wetted it, and choose how to rewet a dry or water-repellent root ball.
- Name the checks that show a root ball wetted through and drained, and what to do with trays and cover pots afterward.
About 18 minutes to read and explore
April on the west balcony, the main instructional example in this course. Like every case here, it is set in one temperate Northern Hemisphere city at about 40° N (USDA zone 7a). The gift juniper has lived on the balcony's secured slatted shelf since January, in the plastic training potA plain, inexpensive container, usually plastic, used while a tree grows and develops rather than for display. It drains well and is roomier than a bonsai pot, which makes it a practical next home for a tree whose current pot does not drain.Open the glossary it was slip-pottingMoving a plant's root ball, whole, into a slightly larger container and filling only the gap around it with fresh substrate, without loosening, washing, or cutting the roots. Because the roots are barely disturbed, it can fix a pot that does not drain outside the usual repotting season.Open the glossary into in December: an old, peat-rich root ball inside a ring of coarse fresh mix (Course 02, Lesson 7).
On a mild, breezy morning, its owner lifts the foliage aside and pushes a chopstick into the old core, partway between trunk and rim. After a few minutes it comes out dry and pale along its whole length, and the pot feels lighter than after watering (Lesson 2). The core needs water now. The owner waters through the can's fine rose, and within seconds water is running from the holes into the tray under the shelf. They have always stopped once water runs from the holes, so they stop.
The next morning, the chopstick in the core comes out dry and pale again. The coarse ring had carried the water straight down to the holes, and the dried peat had shed what fell on it. The tray said the pot had been watered; the roots in the core got almost none of it. This lesson is about telling those two apart: what a thorough watering does, how to apply one with a can, a hose, or a basin, how water slips past a root ball, and the checks that show it wetted through.
What a thorough watering does
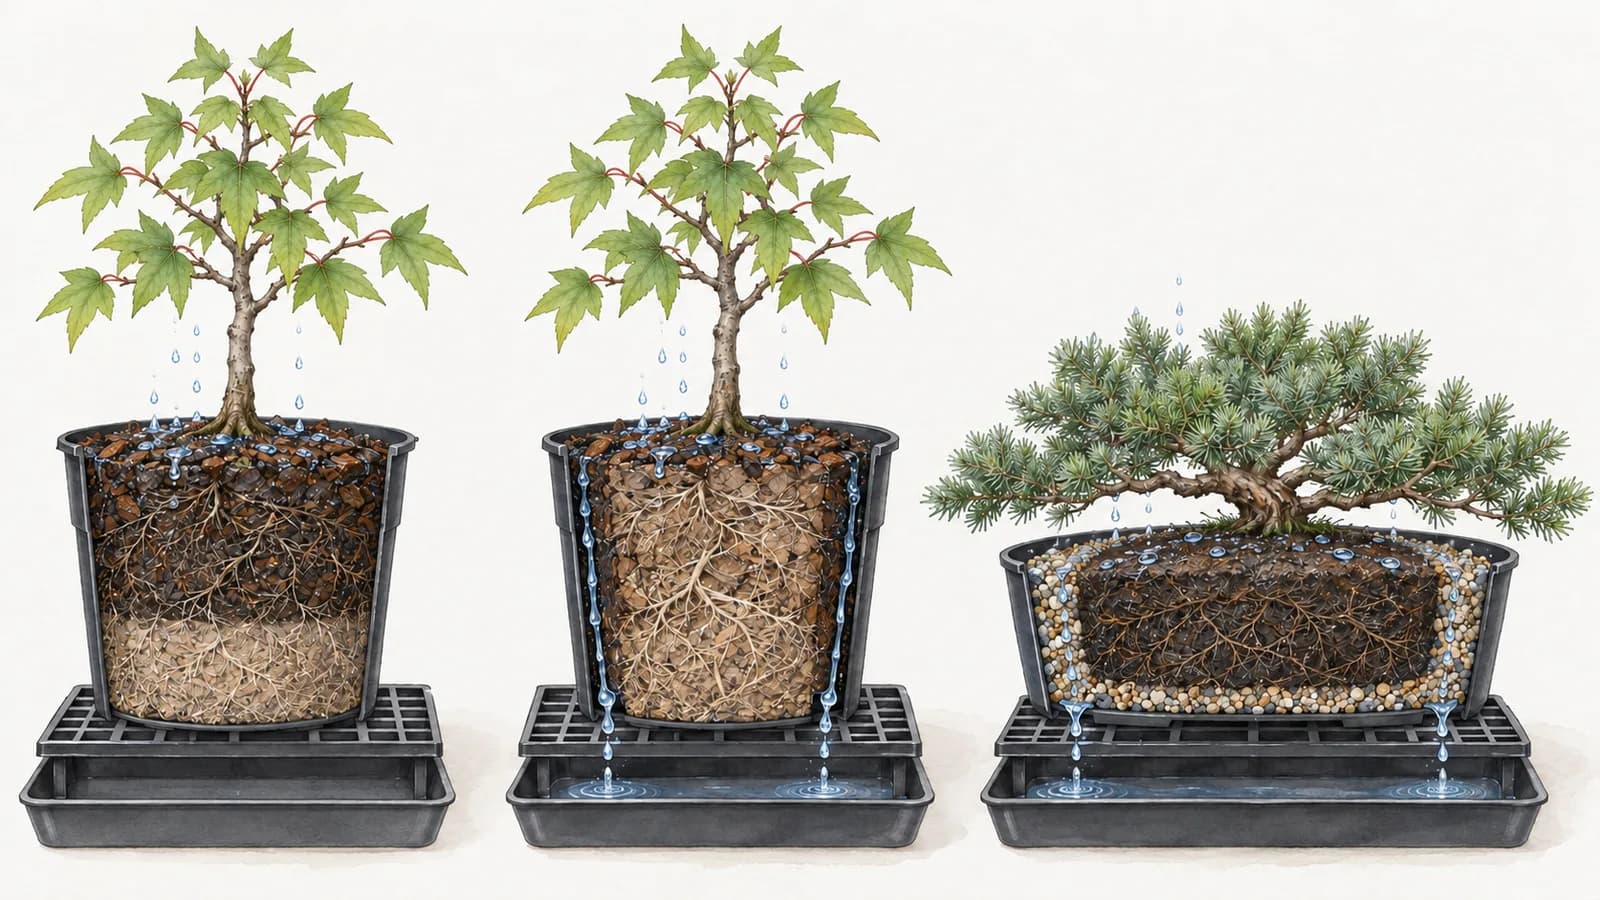
A thorough wateringWater applied evenly across the whole surface, slowly enough to soak in, until it runs from the drainage holes, and then confirmed by a check that the root ball wetted through. It usually takes two or three passes a minute or two apart. Water at the holes alone shows only that water reached the bottom, not that the roots got it.Open the glossary is water applied evenly across the whole surface, slowly enough to soak in, until it runs from the drainage holeAn opening in the bottom of a container that lets extra water run out after watering. Without one, water collects at the bottom and the substrate there stays saturated, so roots run short of air; every pot a bonsai lives in needs at least one.Open the glossary, and then confirmed by a check that the root ball wetted through. It usually takes two or three passes, a minute or two apart. Course 02 set the aim: every thorough watering should wet the whole root zone and end with water running from the holes (Course 02, Lesson 1). The gift juniper's pot showed that the second half can happen without the first, so this lesson adds the check.
A thorough watering does three things for the roots:
- It wets the whole root ball. fine rootOne of the many thin, branching roots, often pale when young, that do most of a tree's absorbing of water and mineral nutrients. Fine roots live a relatively short time and are constantly replaced, so they depend on a root zone that holds both water and air.Open the glossary grow all through it, and each takes up water only from the mix around it. A root in a dry pocket gets little from wet mix a few centimeters away, because water moves sideways only slowly through drained or dry mix, and fine roots and root hairA tiny, hairlike outgrowth of a single cell on a root's surface, a short way behind the growing tip, that greatly increases the area for absorbing water and minerals. Some trees, such as pines, grow few and rely more on fungal partners. Root hairs are fragile and short-lived, so disturbing roots destroys many of them and temporarily reduces uptake.Open the glossary that stay dry die and do not revive (Course 01, Lesson 2).
- It drains, and draws air in behind it. For a short time afterward the substrateThe material that fills a container and surrounds a tree's roots, such as a mix of mineral grit, bark, or soil. Its job is to anchor the roots and to hold water, mineral nutrients, and air in a balance the roots can use.Open the glossary is saturatedDescribes soil or substrate whose pore spaces are completely filled with water, leaving little or no air. Brief saturation right after watering is normal in a pot that drains; saturation that lasts starves roots of oxygen.Open the glossary, every pore full of water. In a pot that drains, that is normal: as the extra water runs out, it pulls fresh air into the larger pore spaceThe gaps between particles in soil or substrate, which hold water, air, or both. Large pores usually drain and refill with air after watering while small pores hold water, so the mix of pore sizes sets how wet and how airy a root zone stays.Open the glossary behind it (Course 01, Lesson 7).
- It carries some dissolved salts out. Water that runs through takes some of the soluble saltsDissolved minerals, from fertilizer and from tap water, that can accumulate in a container's substrate as water evaporates. A high concentration makes it harder for roots to take up water and can damage them. Buildup can leave a white crust on the pot or surface, though hard tap water alone can leave a similar crust, so a crust by itself does not show that roots are harmed.Open the glossary left by tap water and fertilizer with it, while small sips that never run through leave them to build up (Course 01, Lesson 10). Watering heavily on purpose to wash salts out, leachingWatering heavily enough that plenty of water runs through the root zone and carries dissolved salts out with it: a thorough watering, a pause of a few minutes, and a second watering, with water that has not been softened. It answers suspected salt buildup and is not a routine, because it rinses out nutrients too.Open the glossary, is part of Lesson 5.
Water that drains out of the holes is the runoff. However much of it there is, a thorough watering is not overwateringKeeping a root zone wet so constantly, or letting it drain so poorly, that air never gets back into its pores and the roots run short of oxygen. It is about how often a pot is watered and how well it drains, not how much is poured at once: a thorough watering of a pot that drains, given when the root zone is drying, is not overwatering.Open the glossary. Overwatering is not a large amount poured at once; it is a root zone kept wet so constantly, or draining so poorly, that air never gets back in (Course 01, Lesson 7).
Technique: slow passes over the whole surface
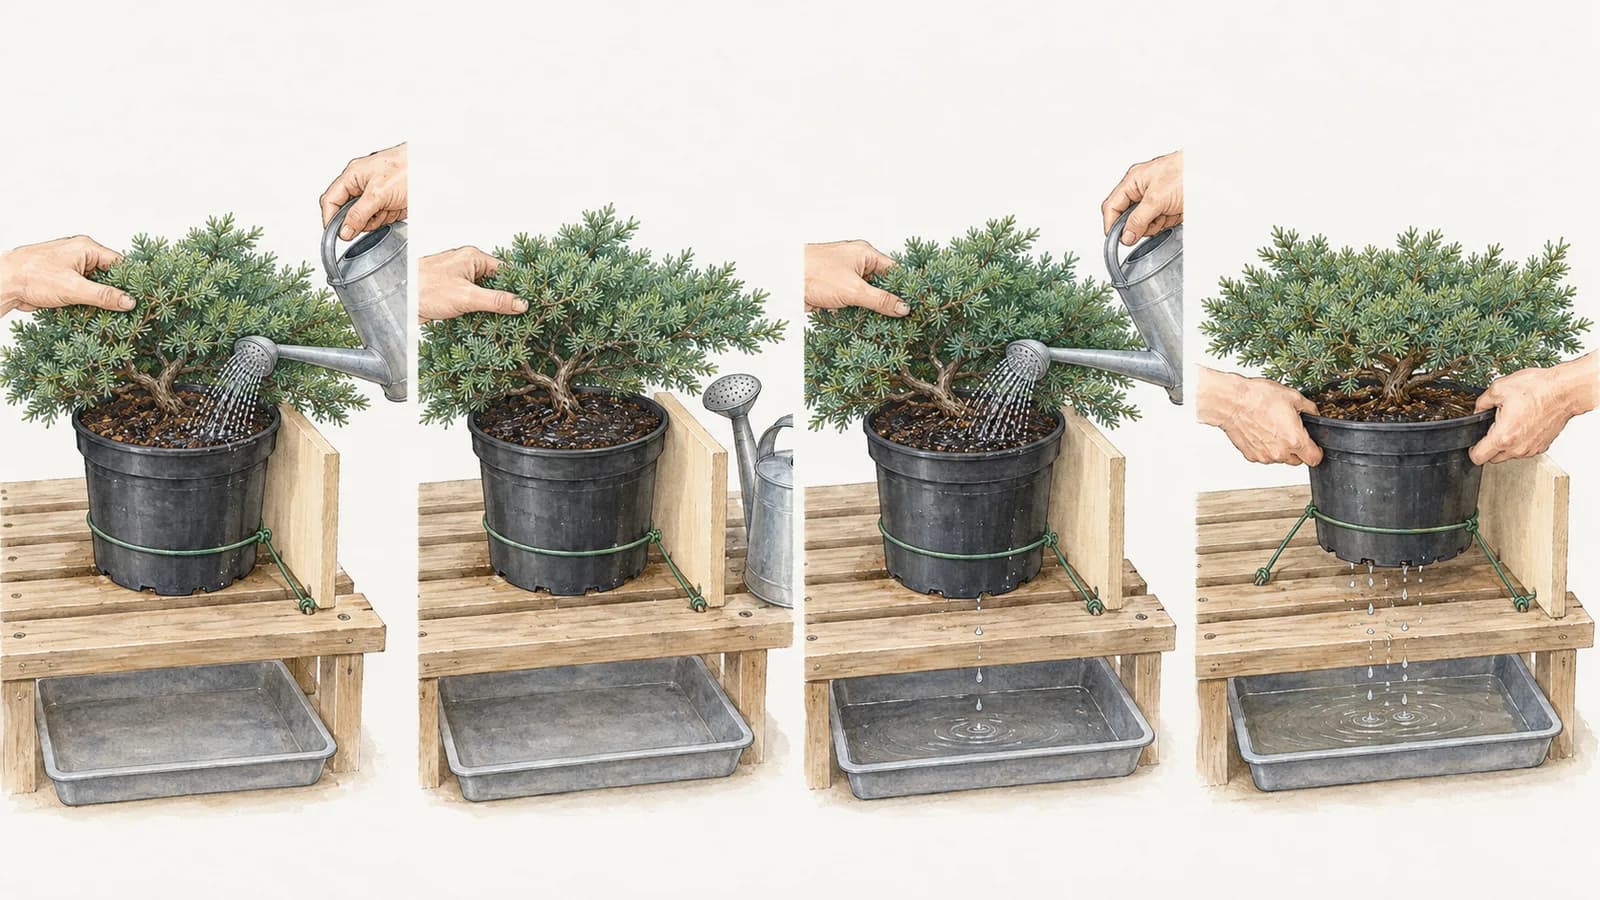
The method is the same with a can, a hose, or at a sink: spread the water over the whole surface, only as fast as it soaks in, in passes. The pot and the place decide the tool: a can with a fine rose for most pots, and wherever the water has to be carried; a hose wand on a gentle shower in a yard where the runoff can soak away; and, for a root ball that is bone dry or has shrunk from the wall, immersion in a basin, described under rewetting below.
A fine rose, held low
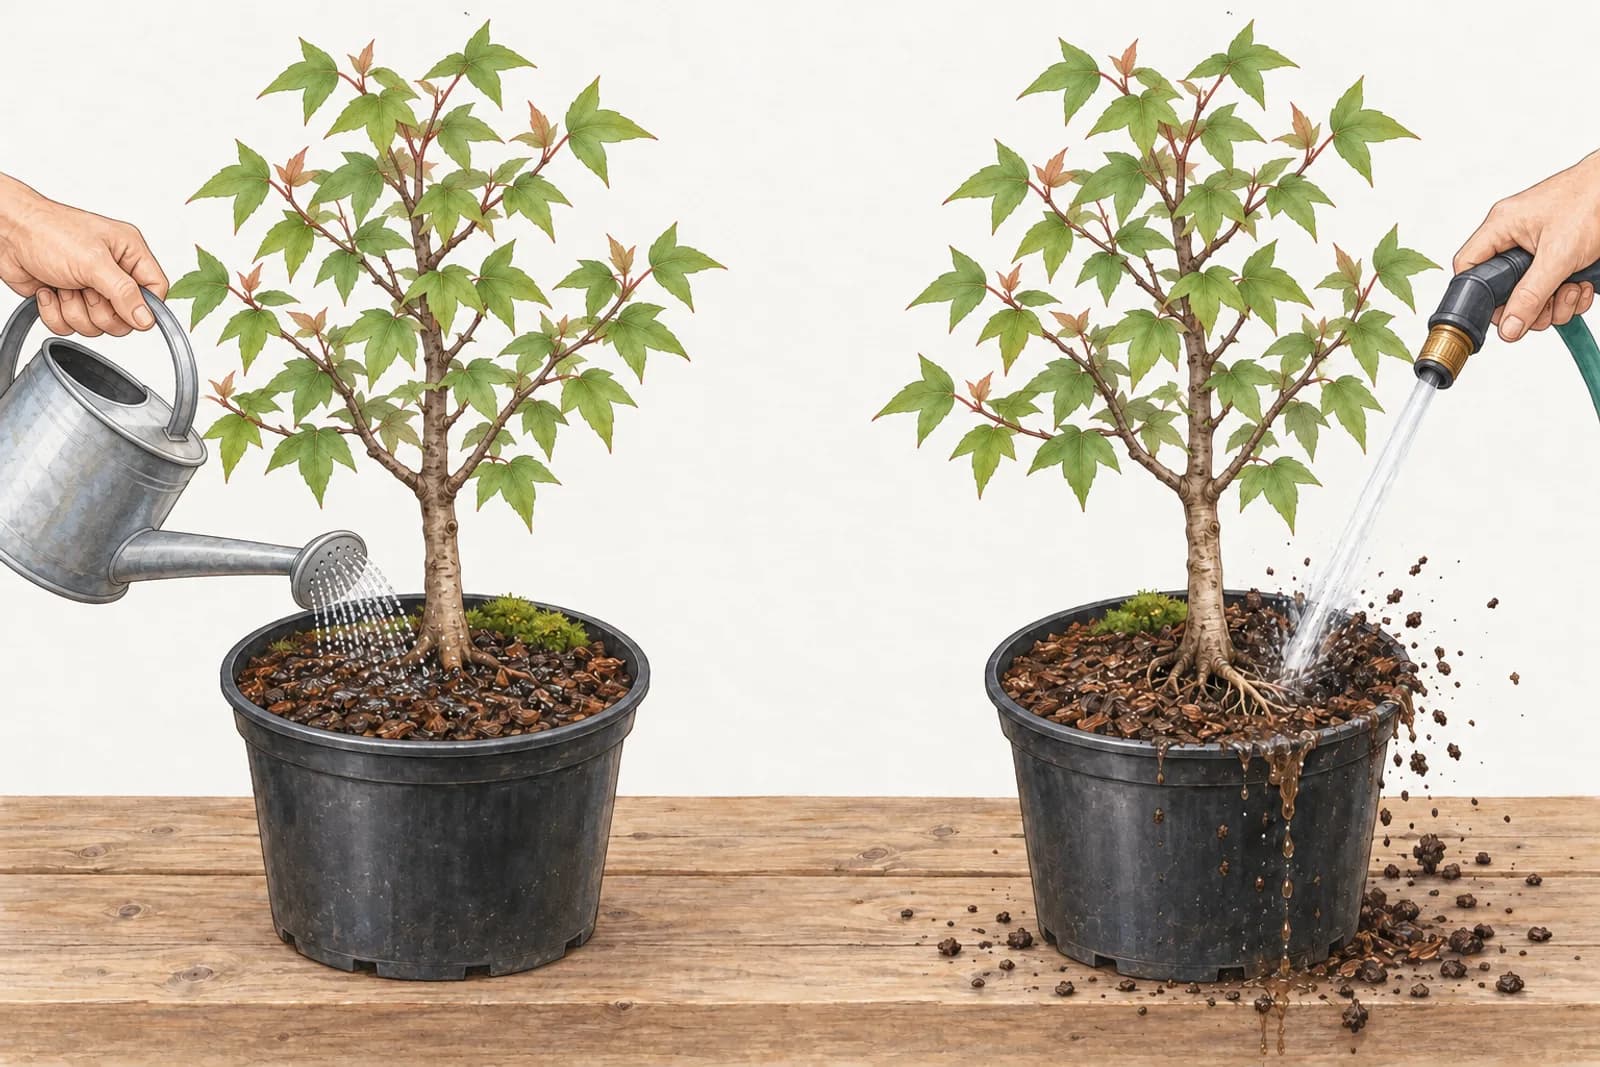
A fine watering roseThe cap pierced with many small holes on the end of a watering can's spout, which breaks the flow into a gentle shower. A fine rose wets a pot's whole surface evenly without washing the substrate away or cutting channels through it.Open the glossary breaks the flow into a gentle shower of small drops. Hold it low, a few centimeters above the mix, so the drops land softly instead of splashing grit out or digging into the surface, and keep it moving. Cover the whole surface on every pass: the rim all the way round, the middle, and the base of the trunk, which is easy to miss because the trunk and lowest branches are in the way.
Both junipers on the west balcony spread about 30 cm (12 in) across, wider than their pots of 20 and 22 cm (8 and 9 in), so their foliage hides most of the surface. Water poured onto it runs to the edges and drips off past the rim, as rain does (interceptionRain caught on foliage before it reaches the pot. Some evaporates from the leaves, and a canopy wider than its pot drips much of the rest off its edges, past the rim, so the root ball under a dense, spreading canopy can stay much drier than the rain suggests.Open the glossary, Lesson 5), so lift the foliage pad aside with one hand and water under it with the other.
Slow passes, a minute or two apart
Pour only as fast as the surface takes water in; if water starts to pool, pause until it has soaked away. Go over the whole surface, wait a minute or two, and go over it again: a damp surface takes water in better than a dry one, so the later passes soak in instead of running off. Keep going until water runs from the holes, usually on the second or third pass, then stop pouring and check the watering, as described later in this lesson. Drips during the first pass are a reason to check sooner, not proof of a good watering: if the pot already feels heavy, as if just watered, it is done; if it is barely heavier, the water has found an easy path past the roots. If water pools at every watering, however slowly you pour, the mix itself may be the problem (Course 04, Soil, Substrates, and the Root Environment).
Water the whole surface puts that habit into practice on the gift juniper in late May, when new roots have grown out into the coarse ring. Its chopstick came out dry, with only the tip faintly damp, and the pot is light. You look down on the pot, mostly hidden under the canopy, and choose where the rose goes on each pass with seven numbered zone buttons: the four quarters of the rim, two inner zones between the trunk and the rim, and Around the trunk. Before the first soak, an optional quick call asks how far one slow pass will soak into the old core: answer it, or press Skip. Zones under the foliage unlock when you press Lift the foliage pad, and End the pass cuts through the pot to show where the water went. You have up to three passes, with a pause of a minute or two before each new one. The exercise ends when every zone is wet to the bottom, or after the third pass.
- On the first pass, try Pour over the foliage once, then water only what you can reach without lifting the foliage, Rim, front and Rim, right, and press End the pass. Watch the drainage holes.
- Press Pause, then pass 2, then Lift the foliage pad, and wet every zone by the end of the third pass.
- For the optional challenge, press Try again and do it in two passes.
Exercise
Water the whole surface
The gift juniper · late May
The chopstick in the old core came out “Dry, with only the tip faintly damp”, and the lift says “Light”: time to water thoroughly. Since the core was rewetted in April, the peat takes water again. The foliage pad hides most of the 22 cm (9 in) pot, and new roots have grown out into the ring of coarse mix.
Pass 1 of 3
Optional challengeDo it in two passes
- Darker surface: water soaked in
- Glossy pools: water still sitting on top
- Zone number (blue once watered this pass)
Water the zones
Zones to water on this pass
0 of 7 zones watered on this pass
Text description
A view from straight above of the gift juniper in late May, in its round black plastic training pot about 22 cm (9 in) across, on the slatted shelf of the west balcony, with a board shading the pot's sunny side. The old, dark, peat-rich root ball shows on the surface as an oval core, with a ring of pale coarse mix around it, narrow at the ends of the oval and wider at its sides. New roots have grown out into the ring. A dense, spreading foliage pad covers most of the surface, leaning to the back and left and hanging past the rim there, so only the front and right of the rim show. The watering can's fine rose waits at the lower right.
The surface is divided into seven numbered zones:
- 1, Rim, front: the quarter of the rim nearest you, mostly clear of the foliage.
- 2, Rim, right: the right-hand quarter of the rim, mostly clear of the foliage.
- 3, Rim, back: the far quarter of the rim, under the overhanging foliage.
- 4, Rim, left: the left-hand quarter of the rim, under the overhanging foliage.
- 5, Inner, front-right: between the trunk and the rim, on the front and right side, under the foliage.
- 6, Inner, back-left: between the trunk and the rim, on the back and left side, under the foliage.
- 7, Around the trunk: the middle of the pot, around the base of the trunk.
The zone buttons are laid out like the map, back row first: 6 and 3; then 4, 7, and 2; then 1 and 5. Zones under the foliage pad can be watered only after Lift the foliage pad, which folds the pad up and aside, held down by a hand, so the whole surface shows. Pour over the foliage waters the top of the pad instead. Pressing a zone moves the rose there on a spring, and it sweeps across the zone while water falls, then returns to rest. On the drawing, water that has soaked in darkens the surface, and water still sitting on top shows as glossy pools. Each zone button says whether that zone has had water on this pass, and on how many passes so far.
End the pass flips the drawing over to two cutaways through the pot: A, from front to back, and B, from left to right. Each passes through five of the zones, numbered above the cut, and between them they pass through all seven. Each cut shows the old peat core, dark brown, filling most of the pot, and the pale coarse ring at each end, between the core and the wall, with a thin layer of the same coarse mix under the core. Wet mix is blue, with soaking streaks; mix the water has not reached keeps its own color: pale in the coarse ring, dark brown in the peat core. A dashed blue line marks the wetting front, the edge of the water inside the mix, and it moves as the cutaway appears. Blue drops below the pot show water running from the drainage holes, and a chip on that cut says Water at the holes. Above each zone, its numbered pin turns solid blue when the mix under it is wet to the bottom, blue on its top half when it is wet partway down, and white with a red ring when it is not wetted. The same results appear as text beside the drawing after every pass.
You have up to 3 passes, with a pause of a minute or two between them. Before the first soak, an optional question asks: How far down will one slow pass soak into the old core? The choices are To the bottom of the pot; Partway down; Only the top layer; or Skip. You can change your choice until a pass that waters a zone ends. The exercise ends with “Even all the way round” when every zone is wet to the bottom by the end of the last pass. Otherwise it lists the parts left dry, what the lift and a chopstick in the old core would say, and offers Try again. The optional challenge is: Do it in two passes.
On the first pass, the water on the rim ran straight down the coarse ring and along the layer under the core to the holes, so the holes dripped while the old core beside the ring was wet only partway: water at the holes showed only that water reached the bottom. The water poured over the foliage barely wet the mix, because most of it ran off the needles and dripped past the rim. One slow pass soaked only partway into the peat. After the pause, the damp surface took the next pass in faster and carried the water to the bottom, so every zone needed water on two passes to wet through, which is why a thorough watering is usually two or three passes.
Zones under the canopy stayed dry until the pad was lifted aside, and each zone the rose missed showed in the cutaway as a dry wedge reaching down from the surface, while a zone watered on one pass only was wet near the top and dry below: water soaks down more readily than it spreads sideways, so a patch missed on top stays drier below. In late May that matters most at the rim, where new roots have grown into the ring. When wedges were left, the lift and a chopstick in one spot could disagree, and then the rule is to add a check before you decide.
The same method on the balcony, at the sink, and with a hose
Each place changes where the water comes from and where the runoff goes; the passes stay the same.
On the balcony: carry the water, catch the runoff
The west balcony has no outdoor tap, so every watering is carried from the kitchen in a can of about 2 L (about half a gallon), and drips land on the neighbors' balcony below (Course 02, Lesson 7). Slow passes suit both limits: more of each canful stays in the root ball, and the runoff drips into the tray under the shelf, or the trident maple's tray under its grid, without overflowing. Immersion and leaching, which release far more water than a tray can hold, happen in a basin or at the sink.
Indoors: water at the sink
At the bright window, runoff on the sill would reach the radiator, and the ficus's plastic growing pot sits inside a glazed outer pot with no hole, a cachepotA decorative outer pot, usually without a drainage hole, that holds a plainer pot inside it. Water that drains from the inner pot collects in it, so it has to be emptied after every watering or rain, or the bottom of the root ball sits in water.Open the glossary. So its owner carries the growing pot to the kitchen sink, waters it there in slow passes until water runs from the holes, and lets it drain until the drips stop before it goes back. An hour later, they tip the outer pot and pour away any water that has collected (Course 02, Lesson 7).
In the backyard: a gentle wand on low flow
The small backyard has a hose with a shower-head wand, and its runoff soaks into the lawn. Set the wand to a gentle shower on low flow and use it like a rose: low, moving, in passes. Never use a jet: a hard stream digs out the mix, bares roots, and cuts a path that later waterings follow straight down. Hose water left lying in the sun can be hot enough to harm roots, so run it onto the lawn until it comes out cool on the back of your hand. For the smallest pots, such as the Chinese elm's 15 cm (6 in) nursery pot, the can is easier to control.
Infiltration, wetting fronts, and channeling
When water soaks into the surface and moves down into the root zone, rather than pooling, running off, or slipping past down the sides, it is called infiltrationWater soaking into the surface of the substrate and moving down into the root zone, as opposed to pooling on top, running off the surface, or slipping past down the sides of the pot. A dried, peat-rich or water-repellent surface takes water in slowly, so slow passes give it time to soak in.Open the glossary. As it soaks down, the boundary between mix that water has reached and mix still dry moves down with it: the wetting frontThe moving boundary between substrate that water has reached and substrate still dry, as water soaks down through a pot. In a mix that takes water well, it moves down fairly evenly and spreads only a little sideways, so a patch missed on top stays drier below; when it reaches the bottom, water starts to drip from the holes.Open the glossary. In a mix that takes water well, the front moves down fairly evenly, spreading only a little sideways, and when it reaches the bottom, water starts to drip from the holes. That is the left-hand pot at the top of this lesson.
Water also takes the easiest path. When a few paths through a pot are much easier than the rest, most of the water runs down them and out of the holes without wetting the root ball. This is channelingWater running down a few easy paths, such as a gap at the pot wall, a crack, or the edges of a dry, water-repellent core, and out of the drainage holes without wetting most of the root ball. First drips within seconds from a pot that was light suggest it; a pot still barely heavier afterward, or a core that is still dry, confirms it.Open the glossary, and the easy paths are familiar:
- A gap at the wall. A peat-rich or bark-based root ball that dries out shrinks from the pot wall (a coarse mineral mix does not), and water poured on top runs down the gap (Course 02, Lesson 7).
- A crack or a dug-out hole. A dried root ball can crack, and a jet digs a hole that later waterings follow straight down.
- A dry, water-repellent core. Peat-rich mixes shed water after they dry out, until they slowly rewet. That is water repellencyThe way some organic mixes, especially peat-rich ones, shed water after drying out: water beads on them and runs off or past instead of soaking in, until they slowly rewet. Small, slow amounts aimed at the dry part, or immersion, rewet them, while a fast pour runs straight past.Open the glossary: water beads on the dry peat and runs off to wherever it can soak in.
- A coarse ring around a fine core. In the gift juniper's pot, water on the ring runs straight through, and water shed by the dry core joins it.
Signs that water ran past the roots
Channeling happens out of sight, but it leaves three signs you can read from outside:
- First drips within seconds from a pot that was light.
- A pot barely heavier after the watering, when it should feel heavy, as if just watered.
- A dry core: a chopstick pushed into the core and left a few minutes still comes out dry.
Either of the first two signs alone is a reason to check further, not proof: quick drips can come from a coarse, fast-draining mix that is soaking water in, and a small, shallow pot gains little weight even when it is watered well. A dry core, or quick drips together with a pot barely heavier, shows that the water ran past, and then the root ball needs more water, given slowly or by immersion, as the next section describes.
Predict first
Probably not, or only at its edges. Water on the dry peat beads up and runs off to the coarse ring, which passes it straight down to the holes, so the drips come within seconds on every pass and the core gets little. Slowness helps only where the water stays: small amounts aimed at the core itself, or a soak in a basin, which reaches the core from every side. Test both below.
Check your prediction in Watch a watering soak in. Choose a Root ball and a way to water under How. Before the first pass of each setup, predict whether it will wet the root ball through (Yes, No, or Not on the first pass), or press Skip. Then press Water and watch the wetting front, the drips into the tray, and the First drips marker. After each pass, press Check it to lift the pot and read a chopstick in the core, then Another pass if the run allows one. For immersion, press Lower into the basin, press Hold it down if the root ball floats, use Check it to read the core as the bubbles rise, slow, and stop, and press Lift out and drain when you choose. Back, Next, and the row of moments under them step through a run, and Start this setup over runs it again. Each new outcome is added under Outcomes found: find all seven to finish, or five once you have made three right calls with the X-ray view off. Try these:
- With The gift juniper's two zones and Fine rose, slow passes, water three times across the whole surface, pressing Check it after each pass. Then press Start this setup over and, on the second and third passes, press Aim the next pass at the core. Last, try Immersion in a basin: lift it out once while bubbles still rise, then start the setup over and lift it out only after Check it finds the core wet.
- With Dry and shrunk from the wall, compare the first slow pass with the third, then try Immersion in a basin.
- With Moist, open mix, try A quick splash, Spout in one spot, and Hose jet against Fine rose, slow passes.
- Turn X-ray view off. After each pass, press Check it for the lift, and choose under Your call from the surface, the drips, and the lift before the inside is shown.
Animation
Watch a watering soak in
Shows inside the pot as the water moves.
Instructional example · Open mixLate May in the small backyard: the new juniper, still in its 4 L (1 gallon) black nursery pot of open, bark-based mix. The morning check said water: the pot felt light, and the chopstick came out dry, with only the tip faintly damp. The mix has not dried out, so it still takes water readily.
Before watering
Lift: Light. Chopstick in the core: Dry, with only the tip faintly damp. A watering can with a fine rose, held low and moved slowly over the whole surface, up to three passes a minute or two apart.
- Bone dry
- Dry
- Drying
- Moist
- Wet
- Saturated
Outcomes found
0 of 7 found
- Wet through and drained, not found yet
- Wet on top only, not found yet
- Pooled on the surface, not found yet
- Mix washed out, not found yet
- Ran past a dry core, not found yet
- Rewet by immersion, not found yet
- Lifted out too soon, not found yet
Predictions: 0 called it · 0 surprisesX-ray off calls: 0 called it · streak 0
Text description
A large side cutaway of a pot shows the root ball in layers, with a small view of the surface from above beside it. In the cutaway, Bone dry: pale, with crack lines; Dry: pale; Drying: pale over a faint damp band at the bottom; Moist: light blue with air dots; Wet: blue with sparse air dots; Saturated: deep blue under a solid water line, no air dots. Water soaking down is a light blue band with a dashed wavy edge, the wetting front; water running down an easy path is a pale blue channel with moving drops, or blue arrows when the drawing is still. Drips fall from the drainage holes into a tray, and a First drips marker on the drawing says when water first came from the holes: within seconds, or after a while. In a basin, a solid blue line marks the water rising inside the pot, and bubbles of air rise through the dry mix and break at the surface, or still up arrows when the drawing is still; a word chip names the bubbles as steady, slowing, or stopped. From above, the foliage pad swings aside for each pass, and darker mix shows where the water went.
Three root balls to choose from:
- Moist, open mix: Late May in the small backyard: the new juniper, still in its 4 L (1 gallon) black nursery pot of open, bark-based mix. The morning check said water: the pot felt light, and the chopstick came out dry, with only the tip faintly damp. The mix has not dried out, so it still takes water readily.
- Dry and shrunk from the wall: A juniper in a nursery pot of peat-rich nursery mix, missed for too long in hot weather. The root ball is bone dry and has shrunk from the pot wall, leaving a gap all the way round. The pot feels light, and the chopstick comes out dry and pale along its whole length.
- The gift juniper's two zones: April on the west balcony. The gift juniper's old peat-rich root ball sits in a ring of coarse fresh mix in its 22 cm (9 in) training pot. The ring is still damp, but the chopstick in the old core came out dry and pale along its whole length, and dry peat sheds water.
Five ways to water, chosen under How: Fine rose, slow passes; A quick splash; Spout in one spot; Hose jet; Immersion in a basin. Fine rose, slow passes: A watering can with a fine rose, held low and moved slowly over the whole surface, up to three passes a minute or two apart. A quick splash: A quick splash from the can, then on to the next pot. Spout in one spot: The can's spout with the rose taken off, poured in one spot. Hose jet: A garden hose on a hard jet, aimed at the surface. Immersion in a basin: The pot is lowered into a basin of water that comes up to the surface of the mix, left until the bubbles stop, then lifted out to drain. For the gift juniper's two zones, the hose jet is not offered. The balcony has no outdoor tap: every watering there is carried out in a can.
Before the first pass of each setup you can make a prediction, or skip it: Will this wet the root ball through? The answers are Yes, No, Not on the first pass. Press Water (then Another pass, up to three passes with the fine rose; for the gift juniper, passes 2 and 3 can be aimed at the core instead), or, for immersion, Lower into the basin, then Lift out and drain when you choose. If a dry root ball floats in the basin, a Hold it down button appears. After each pass, Check it lifts the pot and reads a chopstick in the core, using the same words as the course; the next pass waits until the last one has been checked. In the basin, Check it reads the core without lifting the pot out, and names the bubbles at the moment it was read. Play, Pause, Back, Next, and Replay step through the moments of the run, and a row of moments under them jumps to any stop. Start this setup over clears the current pot; Start over on the summary card clears everything.
With the X-ray view off, the cutaway is covered: you see only the surface from above, with the foliage pad held aside, the drips, and the tray. Check it then gives the lift, and you make a call before the inside is shown; turning the X-ray view back on waits for the call. The calls are: Wet through; Not wet through: water again slowly or immerse; Can't tell yet: check the core.
There are seven outcomes to find: Wet through and drained, Wet on top only, Pooled on the surface, Mix washed out, Ran past a dry core, Rewet by immersion, Lifted out too soon. Each is stamped on the drawing and collected as a sticker when a check confirms it. The exercise is finished when all seven are found, or five of them plus three calls made right with the X-ray off; a summary card then explains every outcome.
With Moist, open mix, which takes water readily, Fine rose, slow passes wet the root ball through in one pass, with the first drips only after a while; of the pours, it was the only one that did. A quick splash wet only the top; Spout in one spot poured more onto one patch than it could take in, so water pooled there and went down one narrow path while the rest stayed dry; and Hose jet washed mix out, bared roots, and cut channels straight to the holes. With Dry and shrunk from the wall, the first slow pass ran down the gap within seconds and left the pot still light; by the second, the wetted surface had started to take water in, and by the third the root ball had swelled back against the wall and wetted through.
With The gift juniper's two zones, passes over the whole surface ran off the dry peat and down the coarse ring every time, with drips within seconds, until Aim the next pass at the core kept the water on the peat: two aimed passes wet the core through by the third. In the basin, the bubbles rose fast, slowed, and stopped, and immersion rewet every root ball left in long enough, the shrunk one once it was held down. But the gift juniper's peat core stopped bubbling before it was wet through, so lifting it out while bubbles still rose, or as soon as they stopped, left part of it dry: the chopstick in the core decided when to lift it out.
With X-ray view off, the surface, the drips, and the lift settled the call for a pot of one even mix: late drips and a pot heavy, as if just watered, meant it was wet through, and quick drips, no drips, a pool, or a pot still lighter than after watering meant it was not. In the gift juniper's two zones, the damp ring could make the pot feel heavy over a dry core, so when the drips and the lift looked good, the honest call was Can't tell yet: check the core.
Practice check · not scored
Rewetting a dry or water-repellent root ball
A peat-rich or bark-based root ball that has dried out, or has a dried core, will not take water the ordinary way, and pouring harder only sends more of it down the easy paths. Both ways to rewet it rely on time: the water has to stay against the dry mix long enough for it to start taking water in.
Slow passes aimed at the dry part
When the dry part is a core in a pot that otherwise takes water, as in the gift juniper's pot in April, aim the water at the core. Lift the foliage aside, hold the rose low over the old root ball, between the trunk and the ring, and pour a little at a time, slowly enough that the water sits on the peat and starts to soak in instead of running off to the ring. Pause a minute or two, and do it again. It can take several passes before the peat begins to take water in; after that it soaks it up readily. Then read a chopstick in the core; if it is still dry after three or four passes, immerse the pot.
The same small, slow passes can rewet a root ball that has shrunk from the wall, if the rose stays over the root ball itself, away from the gap at the rim.
Aiming at the core is a way to rewet it, not this pot's everyday method. Once the core takes water readily again, go back to passes over the whole surface: by late May, with new roots in the ring, the rim needs water as much as the core does. Either way, the core's chopstick decides when to water, as in Lesson 2: a dry core needs water now, even when the damp ring makes the pot feel only a little lighter than after watering.
Immersion in a basin
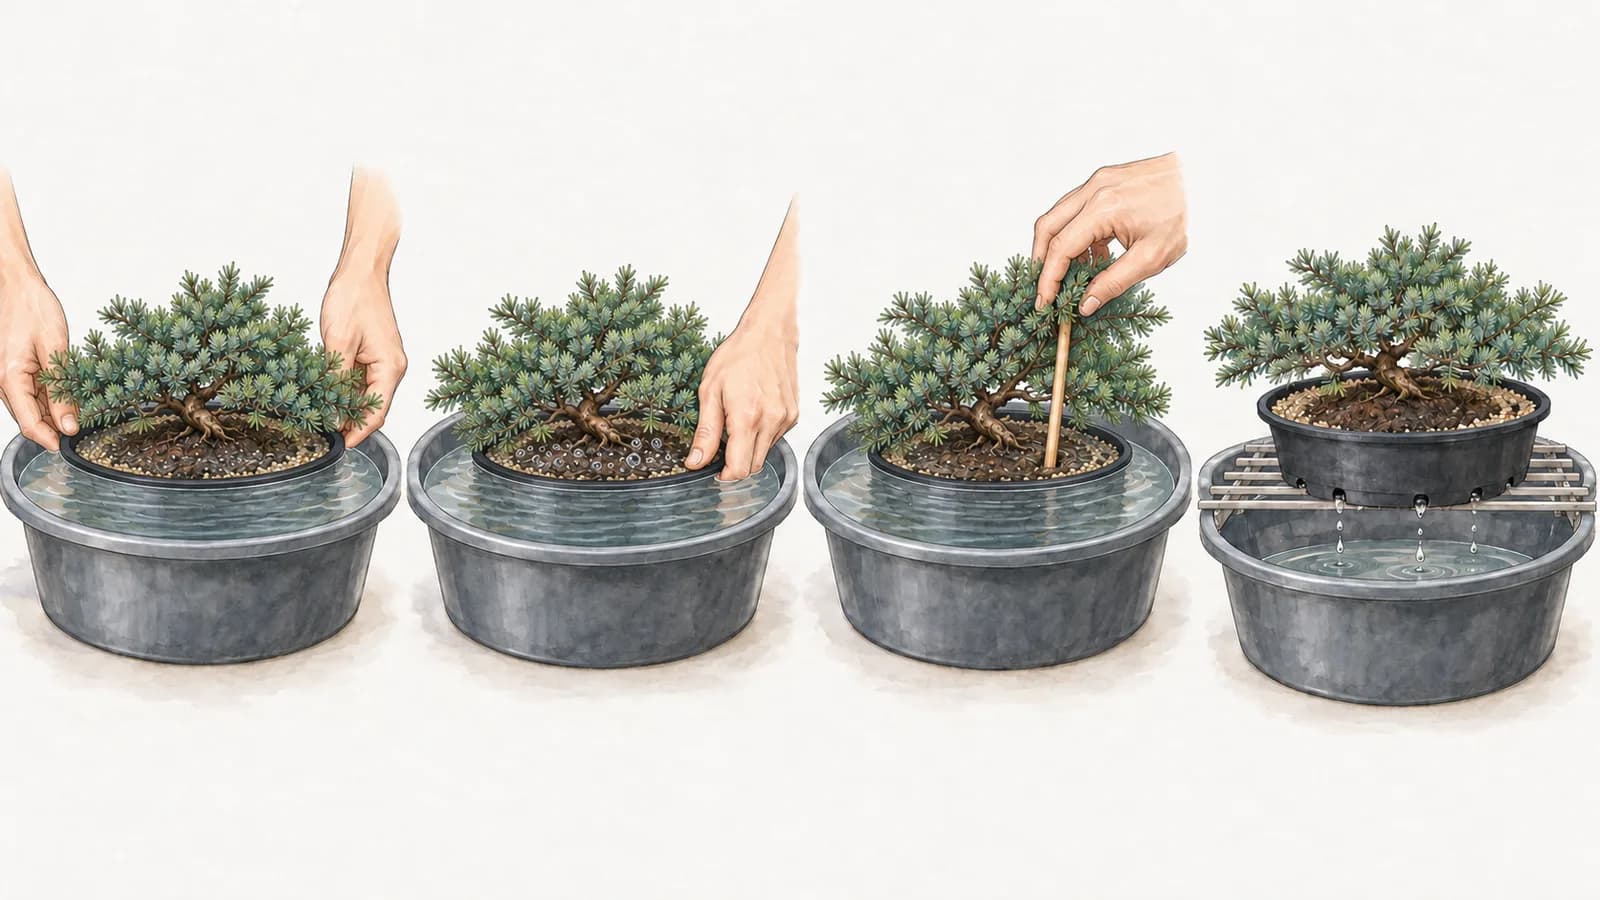
When the whole root ball is bone dry or has shrunk from the wall, immersion is the surer way, and it is the next step when three or four slow passes have not wetted a dry core. This is immersion wateringStanding a pot in a basin of water up to the surface of the mix until the root ball is wet through, then lifting it out to drain fully. Rising bubbles show air leaving; when they stop, check the core with a chopstick, because a water-repellent core can stop bubbling before it is wet. Allow 10 to 30 minutes, up to an hour for a bone-dry, peat-rich root ball, and never more than a few hours: it is never a way to leave a pot standing in water.Open the glossary: standing the pot in a basin of water that comes up to the surface of the mix until the root ball is wet through, then lifting it out to drain fully. It is the soak Course 02 promised for a bone-dry, shrunken root ball (Course 02, Lesson 8).
- Lower it in gently, until the water reaches the surface of the mix. A dry root ball is light and can float, so hold it down with a hand on the rim of the pot, never on the trunk.
- Watch the bubbles. As water pushes air out of the dry mix, bubbles rise fast, then slow, then stop.
- Check the core when they stop, with a chopstick, because a water-repellent core can stop bubbling before it is wet. If it is still dry, leave the pot in longer and check again.
- Lift it out and let it drain fully, on a grid over the basin or in the sink, before it goes back to its spot.
Immersion usually takes 10 to 30 minutes, and up to an hour for a bone-dry, peat-rich root ball. Never leave a pot in for more than a few hours: immersion rewets a root ball, and roots left standing in water run short of air (Course 02, Lesson 7). A pot too big for any basin gets slow passes instead, and more of them.
Rewetting brings the water back, but not every root. Fine roots that died in the drying do not revive, so a tree that dried right out may grow less for a while (Lesson 4).
Which method for which pot
The root ball you find decides the method, and the method decides which check confirms it:
| The pot and root ball | How to water it | What confirms it |
|---|---|---|
| Drying, in a mix that takes water | Two or three slow passes with a fine rose, or a hose wand on a gentle shower outdoors | The lift: heavy, as if just watered |
| A dry core inside a damp ring | Small, slow passes aimed at the core; immersion if it is still dry after three or four | A chopstick in the core |
| Bone dry or shrunk from the wall, and it fits a basin | Immersion, held down by the rim if it floats, then drained fully | Bubbles stopped, then a chopstick in the core |
| Bone dry, and too big for any basin | Many small, slow passes over the root ball, away from the gap | The lift and a chopstick in the core |
Practice check · not scored
Go deeper · optional, not assessedWhy dried peat sheds water
Peat and fine bark are plant material, and their surfaces carry waxy, fatty compounds that water does not cling to. A common explanation is that while the material is moist, water covers those surfaces and they wet easily, but as it dries past a point, the water-shedding parts end up facing outward, so a drop sits on the dry particles as it would on a waxed table.
Given time in contact with water, the surfaces slowly rewet, and once a few pores have filled, capillary pull draws water on into their neighbors. That is why small, slow amounts and a soak work where a fast pour does not. Peat also shrinks as it dries, which opens the gap at the wall; a coarse mineral mix, like the gift juniper's ring, neither shrinks nor sheds water when it dries. Course 04 compares how the parts of a mix hold and shed water.
After watering: confirm, then empty the tray
Three checks that it wetted through
Water at the holes is where checking starts, not where it ends. Three checks confirm a watering:
- The lift. Lift the pot, or tilt one edge of a heavy one. It should feel heavy, as if just watered: the weight you learned for this pot with the lift testJudging how much water a pot holds by lifting it and comparing its weight with how it felt right after a thorough watering and when it was dry enough to need water. It has to be learned for each pot, works best where water is a large share of the weight, and shows how much water the pot holds, not where it is.Open the glossary (Lesson 2). Light, or only a little heavier than before you watered, means the water probably ran past: read a chopstick in the core.
- The chopstick in the core. When the lift leaves doubt, or the root ball has an old core that dries at its own pace, push a chopstick into the core, partway between trunk and rim, and read it after a few minutes. Dark, cool, and wet along its whole length means the core took water.
- The drips. A root ball that is taking water in soaks up a good deal before much drains, so the first drips come after a while, and after you stop pouring they keep falling for a while and slow to a stop. Drips that came within seconds and stop almost as soon as you stop pouring, from a pot that still feels light, point to a channel. If no water comes out after several passes, tilt the pot and check that the holes are open (Course 02, Lesson 7).
For a pot you know, in a mix that takes water, the lift is usually enough. For the gift juniper, the chopstick in the core decides, because the lift cannot say where in the pot the water went.
Trays and cover pots
Once the dripping stops, empty the tray, the saucer, or the outer pot. A pot left standing in its own runoff has become a pot in a cover pot: the bottom of the root ball sits in water and stays saturated (Course 02, Lesson 7). On the west balcony, that means both trays, after every watering; at the bright window, the outer pot, checked an hour later. Outdoors, a saucer or cover pot fills with rain as well, so check it after rain too.
Practice check · not scored
What time of day to water
The check decides whether to water; the time of day decides how well the water serves the day ahead.
- In summer, check in the morning. A pot watered in the morning goes into the afternoon full, when evaporative demandHow strongly the surrounding air draws water vapor from leaves, rising with sun, heat, dry air, and wind. High evaporative demand can make a tree lose water faster than reduced or damaged roots can replace it.Open the glossary, the air's pull on the water in the leaves, is highest (Course 01, Lesson 8). On the west balcony the direct sun arrives in early afternoon, so the morning check, and a watering when it calls for one, comes before the hardest hours.
- Water a dry root zone whenever you find it. That includes midday: waiting for a cooler hour leaves the roots dry through the hottest part of the day, and that does real harm.
- Late in the evening, water the root zone, not the foliage. Leaves that stay wet through a warm night are more open to some leaf diseases (Course 07, Tree Health and Diagnosis), and the roots are what need the water.
A watering you can confirm
The bonsai decision
Water in passes, then confirm
Starting point
When a check below the surface says the root zone needs water (Lesson 2):
- Set up for the runoff. Stand the pot where it can drain: over the tray on the balcony, at the sink indoors, over the lawn in the backyard. Lift a spreading canopy aside.
- Water in slow passes with a fine rose, or a hose wand on a gentle shower, held low and moved over the rim all the way round, the middle, and the base of the trunk. Pause a minute or two between passes, and keep going until water runs from the holes, usually on the second or third pass. If the check found a dry core in a two-zone root ball, aim the later passes at the core.
- Stop pouring and confirm. Lift the pot: it should feel heavy, as if just watered. If it is barely heavier, or the root ball has an old core inside fresh mix, like the gift juniper's, read a chopstick in the core after a few minutes. Watch the drips slow to a stop.
- Empty the tray or the outer pot once the dripping stops.
This assumes
- The tree is established and in active growth, and a check below the surface said water.
- The pot drains, and its mix takes water in once the surface is damp.
- You have a can with a fine rose, or a hose wand with a gentle shower, and somewhere for the runoff to go.
- The months in this lesson belong to the course's Northern Hemisphere example climate; in the Southern Hemisphere, swap north and south and shift the months by half a year.
Change course if
- Water runs from the holes within seconds, and the pot is barely heavier. It ran past the roots. Water again in small, slow passes aimed at the dry part; if a chopstick in the core is still dry after three or four, immerse the pot.
- Water pools on the surface every time. Slow down and make smaller passes. If it still pools at every watering, the mix itself may be the problem (Course 04).
- The root ball is bone dry and has shrunk from the wall. Immerse it until it is wet through, holding the pot down if it floats, then let it drain fully.
- The tree has had root work recently. Fewer roots draw water, so the root zone dries more slowly than before: water only when a check below the surface says it is drying (Lesson 4; the full aftercare is in Course 11, Repotting and Root Development).
- The tree still droops hours after a thorough watering into a moist or wet root ball, or the pot stays heavy for days in warm weather. This is not a watering problem, so add no more water: investigate before watering. Check the core and the holes, look under the pot for standing water, smell the mix, and think back over what has changed, such as root work, a move, or heat and wind (Lesson 4).
Back to the question
How do you know a watering has actually reached the roots?
By checking after you water, not by watching the holes. Water at the holes shows only that water reached the bottom, and in a dry, shrunken, or water-repellent root ball it can get there within seconds down a gap, a crack, or a coarse ring while most of the roots stay dry. A thorough watering spreads water evenly over the whole surface in slow passes until it runs out, and then confirms it: the pot feels heavy, as if just watered, the drips slow to a stop, and when there is doubt, a chopstick in the core comes out dark, cool, and wet. When the checks say the water ran past, water the dry part again slowly, or immerse the pot, then let it drain and empty the tray.
Key takeaways
- A thorough watering wets the whole root ball, then drains, drawing fresh air into the pores and carrying some dissolved salts out. A check confirms it, not the water at the holes.
- Lift a spreading canopy aside, hold a fine rose or a gentle hose wand low, and cover the rim, the middle, and the trunk base in slow passes a minute or two apart until water runs from the holes. Never use a jet.
- Water takes the easiest path: a gap at the wall, a crack, or a coarse ring around a dry, water-repellent core. Quick first drips are a reason to check, not proof; a dry core, or a pot still barely heavier after them, confirms that the water ran past.
- Rewet a dry core with small, slow passes aimed at it, and a bone-dry, shrunken root ball by immersion: check the core when the bubbles stop, then lift it out to drain fully.
- After watering, lift the pot and, when in doubt, read a chopstick in the core, then empty the tray or outer pot. In summer, check in the morning so that any watering it calls for comes before the hot afternoon, and water a dry root zone whenever you find it.
Optional · not required for completion
Compare three ways to water one pot
Choose one pot. The next time its check says water, pour quickly until the first drips appear, then stop and lift it. Finish with two or three slow passes until water runs again, and lift it once more: the difference is water the quick pour would have missed. On a later watering, if the pot fits a basin, rewet it by immersion instead, check the core when the bubbles stop, let it drain fully, and lift it again, emptying the tray each time. Did the slow passes leave it as heavy as the soak did, and how much lighter was it after the quick pour alone?
No tree? Pack three plastic cups that have holes in the bottom with peat-based potting mix, water them, and leave them for a week or two, until the mix has dried and pulled away from the sides. Over a sink, give the first cup one quick pour and the second three slow passes a minute apart. Stand the third in a bowl of water until the bubbles stop, then push a chopstick into its center, and if it comes out dry, leave the cup in longer. Let all three drain and lift each in turn: which feels heaviest? Then cut them open. How far in did the water reach in each, and where did it miss?