Course 02 · Lesson 6 of 8 · Setting up a good start
Choosing healthy, useful starting material
Every starting tree arrives with years of work already done or still ahead. Compare seedlings, liners, nursery stock, pre-bonsai, and developed bonsai, learn to check a tree's health before its price, and match the material to your goal, place, and budget.
The question
Which tree is the best start for what you want to learn, and how can you tell it is healthy?
By the end of this lesson, you will be able to:
- Compare liners, nursery stock, pre-bonsai, developed bonsai, and mass-market bonsai by how much of the development path is already done, what they cost, and what they teach first.
- Inspect a candidate tree's foliage, pests, trunk and branches, root flare, root zone, and label, and tell warning signs from features you can deal with later.
- Choose starting material that fits a stated goal, place, budget, and timescale, and recognize when to walk away.
About 16 minutes to read and explore
Late spring at a garden center in the course's example climate (an instructional example). On the outdoor sales bench, compact junipers in black nursery pots cost little. Indoors, on a gift shelf, a ficus with a thick, curving trunk sits in a glazed pot, its tag reading only “Ficus.” In the bonsai area out back, a trident maple in a wooden box carries a high price, its trunk already thick. On the clearance bench, a juniper like the ones on the sales bench is marked half price. And among the young plants, a Chinese elm with a stem as thin as a pencil costs least of all.
Any of these could be someone's first bonsai. But the cheapest is not automatically the best buy, the most finished is not the easiest, and the bushiest is not the best material. Choosing well comes down to two questions, which this lesson takes in turn: how far along is each tree already, and is it healthy enough to start with at all?
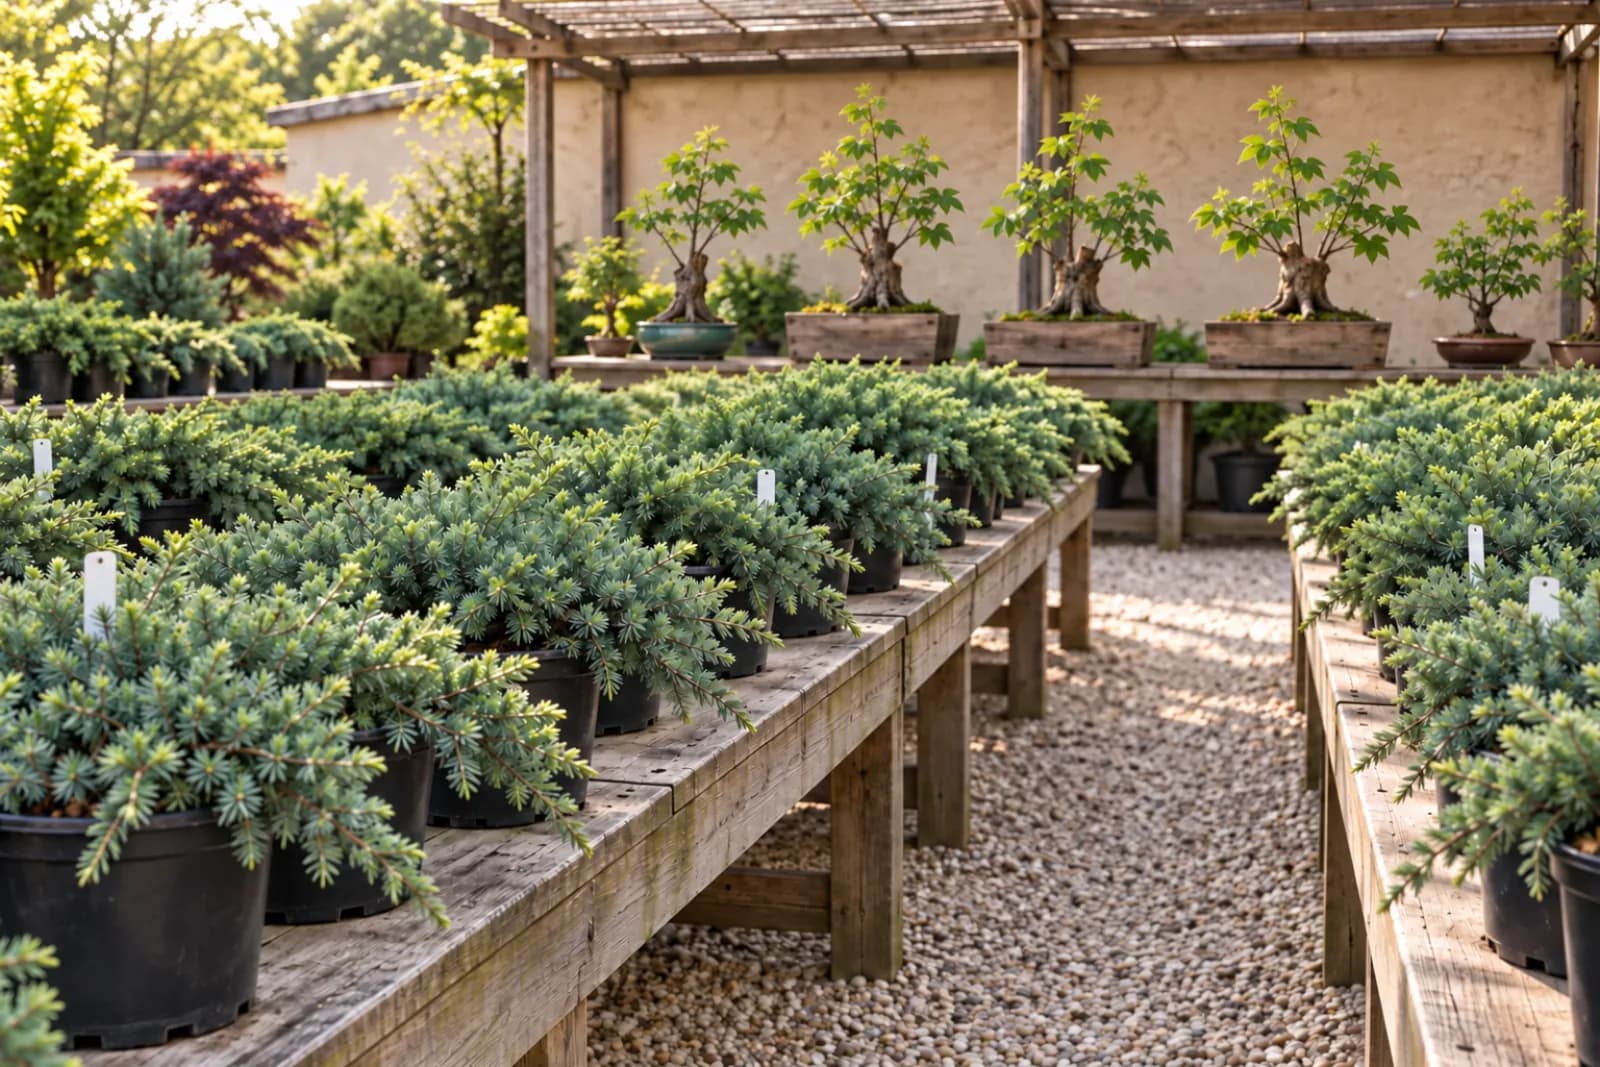
Every starting tree is somewhere on a long path
Making a bonsai from scratch runs through three long phases, roughly in this order and with plenty of overlap:
- Grow the trunk and roots. The tree grows freely so its trunk thickens and its roots spread. This is the longest phase.
- Choose and build the main structure. The trunk is often cut back, a new top grows, and the few main branches the design will use are chosen and grown out.
- Refine the fine branching. Repeated trimming divides each branch into many short twigs, usually once the tree is in a bonsai pot.
After that comes care that never ends: keeping the tree healthy and in shape, every year.
Starting material is sold at different points along that path, and what is already done is largely what you pay for.
- Seeds, which you sow and raise yourself (Course 01, Lesson 11). Every phase is still ahead.
- linerA young plant, such as a seedling or a rooted cutting, sold small for growing on. The name comes from nurseries lining young plants out in rows. Liners cost little, but they need years of free growth, ideally in the ground or a large container, before there is a trunk to style.Open the glossary, young plants such as seedlings or rooted cuttings, sold small for growing on. Very cheap, with only a small start on the trunk and roots.
- nursery stockOrdinary plants grown by a nursery for gardens and landscapes and sold at garden centers, usually in black plastic nursery pots. It is affordable and usually healthy, which makes it a common first bonsai, but it is grown to look full rather than for bonsai structure, so its trunk is often thin and its root flare buried.Open the glossary, the ordinary plants a garden center sells, grown to look full in a garden rather than for bonsai. Affordable, usually healthy, and partway through the first phase: plenty of branches, but a thin trunk, a root flareThe place at the base of the trunk where it widens and spreads into the main roots. A visible flare that spreads evenly makes a bonsai look stable and old and is slow to create, so it is worth checking for; in nursery pots it is often buried a few centimeters under the mix.Open the glossary (where the trunk widens into its main roots) often buried in the pot, and roots that may circle the pot wall.
- pre-bonsaiMaterial grown specifically for bonsai, with its trunk and surface roots already developed, often cut back to start taper, and its main structure begun. It costs more than nursery stock because years of the slowest work are already done.Open the glossary, material grown for bonsai, usually by a specialist nursery, with the trunk and surface roots developed and often a first cut made. The first phase is done and the second begun, and the price reflects those years.
- developed bonsaiA tree with years of bonsai design and refinement already done: a set trunk line, main branches, and fine branching, usually in a bonsai pot. It is the most expensive start and needs skilled, steady maintenance to keep what has been built, so it is rarely the easiest first tree.Open the glossary, trees with years of design and refinement already done. The most expensive start, and the one that needs the most skill to keep as it is.
How far along a tree is says nothing about its health, which you check separately on every tree.
In How far along is it already?, every row under Starting point is drawn against the same Now line: the solid pieces to its left are Done before you buy it, and the dashed pieces to its right are Still ahead of you. Start with Seed and press Play to watch a trident maple grow through the whole path, or step through it with Next and Back. Then choose Nursery stock, Pre-bonsai, and Developed bonsai in turn, and compare each row and its card: Relative cost, Main risk, and Who it suits.
Animation
How far along is it already?
- Trunk and rootsUnder way
- Main structureAhead
- Fine branchingAhead
- Ongoing careAhead
Seed sown
A trident maple seed in a small pot of fresh mix. Everything is ahead.
Starting point
Seed
A seed you sow and raise yourself.
Already done when you buy it
- Trunk and rootsAhead
- Main structureAhead
- Fine branchingAhead
- What you learn first
- Germination and seedling care, then how a young tree grows: light, watering, and steady growth over many seasons.
- Main risk
- Seedlings are fragile at first, and it takes years before there is a trunk worth designing. Many people give up before then.
- Who it suits
- Patient growers who enjoy the whole process and have room for many young trees.
Seed sown. A trident maple seed in a small pot of fresh mix. Everything is ahead.
Text description
A timeline compares five starting points for a bonsai, and a drawing of one tree, a trident maple, grows from a seed to a refined bonsai. The long path to a refined bonsai has three phases, then care that never ends:
- Grow the trunk and roots. Let the tree grow freely, best in the ground or a large container, so the trunk thickens and the roots spread. This is the longest phase.
- Choose and build the main structure. Cut the trunk back, grow a new top (a leader), and choose and grow the few main branches the design will use.
- Refine the fine branching. Trim again and again so each branch divides into many short twigs, now in a bonsai pot.
- Keep it healthy and in shape. Every year, trim the new growth back and keep care steady. This part never ends, whatever you start with.
Each row of the timeline lines its starting point up at Now. The part of the path someone else finished before you buy the tree sits to the left of Now; the part still ahead of you sits to the right, running from Now through years later to many years later. The starting points are:
- Seed. A seed you sow and raise yourself. Already done: Nothing yet. Every phase is still ahead. Relative cost: lowest. What you learn first: Germination and seedling care, then how a young tree grows: light, watering, and steady growth over many seasons. Main risk: Seedlings are fragile at first, and it takes years before there is a trunk worth designing. Many people give up before then. Who it suits: Patient growers who enjoy the whole process and have room for many young trees.
- Rooted cutting or liner. A young plant raised from a cutting or a seed and sold small, for growing on. Already done: A small start on the trunk and roots. Relative cost: very low. What you learn first: Everyday care of a young tree, and how a trunk thickens: by growing freely, untrimmed, in the ground or a large container. Main risk: Keeping it in a small pot and trimming it early. A thin stem then stays thin for years. Who it suits: Beginners on a small budget who will grow several trees at once and wait for the trunks.
- Nursery stock. An ordinary garden-center plant, grown for gardens rather than for bonsai. Already done: Part of growing the trunk and roots. Relative cost: low to moderate. What you learn first: Care through the seasons, then reading a tree: finding a trunk line and choosing which branches to keep for a first styling. Main risk: Lots of branches are not the same as useful structure. The root flare is often buried, roots may circle the pot, and the trunk is usually thin for its height. Who it suits: Most beginners: affordable, usually healthy, and with enough to work on to learn care and a first styling.
- Pre-bonsai. Material grown for bonsai, with the trunk and surface roots developed and the main structure begun. Already done: The trunk and roots, and the start of the main structure. Relative cost: high. What you learn first: Building structure: growing a new top (a leader), choosing the main branches, and keeping strong roots healthy in a shallow container. Main risk: A higher price for work you must judge before you buy: check the cuts and how well they are closing, any graft union, the surface roots, and where it was grown. Who it suits: Growers who have kept trees healthy through a full year and want a head start on the slow trunk and root work.
- Developed bonsai. A tree with years of design and refinement already done. Already done: All three phases. Ongoing care is what is left. Relative cost: highest. What you learn first: Maintenance: watering a shallow pot with care, trimming new growth to keep the shape, and repotting when it is due. Main risk: The most expensive start and the least forgiving. A few weeks of poor watering or placement can undo years of someone else's work. Who it suits: Growers who already keep trees healthy in every season, ideally with a teacher or club nearby. It is not the easiest first tree.
Choose a starting point, then press Play or Next. The drawing begins where that starting point begins and grows through the frames still ahead of it:
- Seed sown. A trident maple seed in a small pot of fresh mix. Everything is ahead.
- Young whip. A whip: one thin, unbranched stem with a few pairs of leaves. Rooted cuttings and liners are often sold at about this size.
- Bushy young tree. Moved up to bigger pots and growing freely: taller, a little thicker, and branching everywhere. Nursery stock is often sold at about this stage.
- Trunk grown. Free growth has thickened the trunk and spread the roots. Next, the trunk is cut back hard, low down, to start a tapering trunk.
- New leader growing. A new top (a leader) grows from just below the cut, and the surface roots are spread out in a wide, shallow box. Pre-bonsai is often sold at about this stage.
- Main structure set. The leader and a few main branches have been chosen and grown out, and the big cut is slowly closing over.
- Fine branching. Years of repeated trimming have divided the branches into many fine twigs, now in a bonsai pot. A developed bonsai is sold at about this stage.
- Kept in shape. Each year new shoots grow out and are trimmed back. This care never ends, whatever you start with.
The rows make a staircase: the further along a start, the more of its row sits left of Now, and the higher its relative cost, from Lowest for a seed to Highest for a developed bonsai. Phase 1, growing the trunk and roots, is the longest piece, which is why seeds and liners are cheap and pre-bonsai is not: the years are the price. Nursery stock sits partway through phase 1, bushy but thin in the trunk; as its card says, lots of branches are not the same as useful structure. And every row, the developed bonsai's included, ends in the same dotted tail of Ongoing care.
The drawing follows a trident maple. A juniper, which rarely grows new shoots on bare older wood (Course 01, Lesson 12), takes a different route and is not cut back to a bare stump.
Practice check · not scored
Mall bonsai: a way of selling, not a stage
One more kind of starting tree is defined by where it is sold rather than how far along it is. mall bonsaiA small tree sold ready-potted as a bonsai in supermarkets, malls, or gift shops, often labeled “indoor bonsai.” Many have been stressed by shipping and dim shops, carry vague or wrong labels, or sit in pots with glued stones or no drainage hole. A healthy one, carefully inspected, can still be a good start.Open the glossary are small trees sold ready-potted in supermarkets, malls, and gift shops, often labeled “indoor bonsai.” Many have been shipped a long way and kept in dim shops with irregular watering, and many carry a vague or wrong label and sit in pots with glued stones or no drainage hole. The gift juniper from Lesson 2 is typical: a temperate tree that belongs outdoors, tagged “INDOOR BONSAI,” in a glazed pot with no drainage hole and pebbles glued into a hard crust.
None of this makes mall bonsai worthless. Many have trunks already thickened or curved, and a healthy one can be a fine first tree. It simply needs the most careful inspection of any starting material, and often a few corrections at home (Lesson 7).
Collected trees: permission first
A collected treeA tree dug from the wild or from long-established land, such as an old hedge, field, or garden, rather than grown in a nursery. Collecting one, or buying one, is ethical only with the landowner's permission and any permits the law requires, and some species are protected. Newly collected trees need specialist aftercare.Open the glossary, called yamadori in Japanese (roughly “collected from the mountains”), is dug from the wild or from long-established land, such as an old hedge or field, rather than grown in a nursery. Old collected trees can have trunks no nursery could grow in a lifetime. For this course, only the ethics matter:
- Collect a tree, or buy a collected one, only with the landowner's permission and any permits the law requires. In parks and nature reserves, digging plants is usually forbidden.
- Some species are protected by law, and digging them is illegal.
- Ask a seller who collected the tree, where, with what permission, and how long it has grown in its container since.
A newly dug tree has lost much of its root system and needs years of specialist aftercare, so it is not a first tree. How to collect is beyond this course.
Trunks take years, and small pots slow them down
The trunk is the slowest part of a bonsai to build and the hardest to change later. It thickens by secondary growthGrowth in thickness of stems and roots, produced mainly by the vascular cambium adding wood on its inside and phloem on its outside, while a separate layer renews the outer bark. It depends on sugars made by the foliage, used as they are made or drawn from stored reserves.Open the glossary: each year the vascular cambiumA layer of dividing cells, only a few cells thick, between the wood and the inner bark. It adds new xylem on its inner side and new phloem on its outer side, which is how trunks, branches, and roots grow thicker.Open the glossary lays down a new ring of wood, built from sugars the leaves make (Course 01, Lesson 12). A small pot holds few roots, few roots support only a modest canopy, and every trim removes leaves that would have fed the trunk, so a potted, clipped tree adds only narrow rings. Growing freely in the ground or a large container, its roots spread, its canopy grows large, and the rings widen.
So a thick trunk is grown first and shaped later, sometimes with the help of a sacrifice branchA branch deliberately allowed to grow long and leafy for a time, so its foliage supplies extra sugars that thicken the trunk below it and the roots, then removed once it has done its job. Its removal leaves a wound that the tree must grow over.Open the glossary (Course 12, Developing Bonsai from Starting Material). For a fast-growing broadleaf such as a trident maple or a Chinese elm, a useful trunk can take several years in the ground; a slow, compact juniper takes far longer, and in a small pot any tree takes much longer still. That is the hidden cost of a cheap start: seeds and liners cost little money but many years. And for nursery stock, the trunk in its nursery pot is largely the trunk you have for now: style the tree as it is, or grow it on freely for years first. Clipping for shape and growing for thickness pull in opposite directions.
Predict first
The free-growing elm's trunk should be much thicker, while the clipped one is still barely thicker than a pencil. In the large container, spreading roots support a big, untrimmed canopy whose sugars build a wide ring of wood each year. The small pot limits roots and therefore foliage, and every clip removes leaves that would have fed the trunk. The free-growing elm pays for its thickness with long, coarse shoots that must be cut back later, the trade at the heart of the first phase.
Check health before price
A tree's stage tells you what you are buying; its health tells you whether to buy it at all. One visit is only a snapshot, and green foliage alone is weak evidence (Course 01, Lesson 14), so look for several signs that agree. You need only your eyes and hands, a sheet of white paper, a chopstick, and, if you have one, a hand lens. Ask before you handle a tree or lift it from its pot; many sellers will let you, or do it for you.
Foliage, buds, and new growth
Judge the foliage against what that kind of tree normally looks like at that time of year, the standard Course 01 used for vigorA tree's observed growth performance relative to its expected seasonal behavior, meaning what a tree of its kind should be doing at that point in the season. It is judged from shoot extension, bud development, foliage condition, and root activity when visible, across several observations over time, not from one large leaf or green color. A vigorous tree is growing at or above that expected pace.Open the glossary. In late spring, a healthy juniper is dense right into its center, with soft, paler tips; a healthy trident maple has full leaves and strong new shoots.
Some normal seasonal looks mislead: many junipers turn bronze or purplish in winter, deciduous trees are bare from autumn to spring (Course 01, Lesson 13), and junipers shed some old inner foliage each year, mostly in autumn. When nothing is growing, look at the budA compact, undeveloped shoot, flower, or both, containing a growing tip and tightly folded young leaves or flower parts, often protected by overlapping scales. Buds mark the places where new shoots can appear.Open the glossary and twigs: plump, firm buds and twigs that bend rather than snap are good signs; dry, shriveled buds suggest a weak tree or a dead shoot.
The warning patterns are browning that spreads over much of the tree, dull or grayish foliage with no new growth when the tree should be growing, and dead, brittle tips on many branches (diebackThe progressive death of shoots, branches, or roots, usually starting at the tips and moving back toward older parts. It is a symptom with many possible causes, such as root damage, drought, frost, disease, or removing all foliage from a branch that cannot regrow.Open the glossary). Yellow leaves on a broadleaf are harder to read: a few older leaves yellowing after a move into dim light is common, but root and pest problems can start the same way, and a symptom is not a diagnosis (Course 07, Tree Health and Diagnosis). And because a conifer can stay green for weeks after its roots die, good foliage never clears a tree on its own.
Pests and their traces
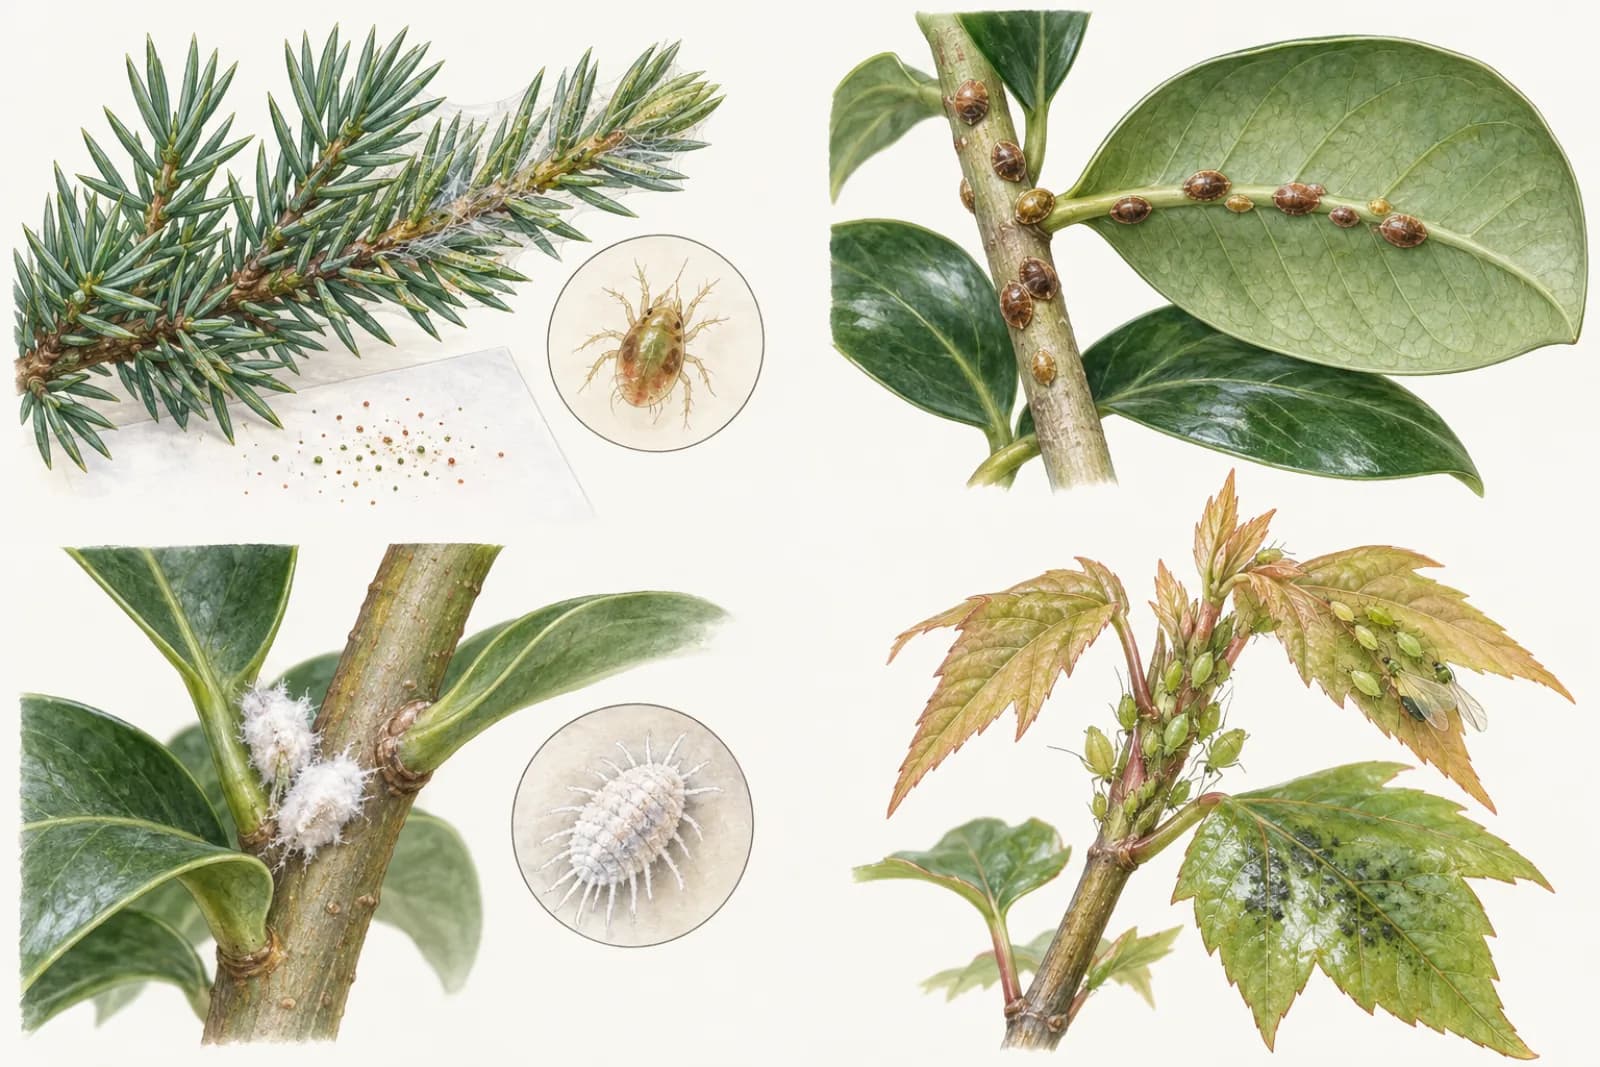
Most pests on a garden-center tree are small and hide in the same places: leaf undersides, the angles where leaves meet stems, the inside of dense needle tufts, and soft new tips. Look there for:
- Webbing: fine silk among needles or leaves, often with dull, speckled foliage nearby. It suggests spider mites.
- Sticky residue: a shiny, sticky film on leaves (honeydewA sticky, sugary liquid left on leaves and stems, and on surfaces below them, by insects that feed on phloem sap, such as soft scale insects, mealybugs, aphids, and whiteflies. Shiny, sticky patches are a sign to look closely for the insects nearby, not a diagnosis of which one it is, and black sooty mold often grows on honeydew left in place.Open the glossary), left by sap-feeding insects such as aphids, many scale insects, and mealybugs. Black sooty mold can grow on it.
- Bumps: small brown or gray raised ovals along stems and leaf midribs that do not move and do not brush off easily. They are typical of scale insects.
- Cottony patches: white, waxy tufts in leaf axils and along stems, often mealybugs.
- Clusters of small, soft insects on shoot tips and young leaves, usually aphids.
Then hold the white paper under a branch and tap the branch sharply: tiny specks that move are often spider mites. These are clues, not diagnoses; Course 07 covers identification and treatment. A few aphids on a vigorous tree are minor, but pests spread over much of a tree, or on a weak one, are a reason to walk away. Whatever you buy, keep it apart from your other plants for its first few weeks (Lesson 8).
Trunk, branches, and bark
Look first for soundness. Bark should be firm and intact, though some bark is naturally loose: junipers shed their outer bark in thin, stringy strips, and Chinese elms and older trident maples flake in patches. What matters is what lies beneath. Bark that lifts away to show brown, dry tissue, or a sunken, discolored patch, suggests the living layer under the bark has died there (Course 01, Lesson 3), and deep cracks or fresh splits open the wood to decay. Old pruning cuts should be closing with a rounded roll of woundwoodNew wood and bark that grow from the living edges of a wound, forming a rounded roll that gradually spreads over the exposed surface. It covers the wound but does not restore the damaged wood beneath. Bonsai growers often call it callus, though strictly callus is the soft tissue that forms first at a wound's edge, before woundwood.Open the glossary (Course 01, Lesson 14).
Then look for usefulness, starting with the trunk, because it is the hardest part to change. Does it narrow from base to top (taperThe narrowing of a trunk or branch from its thick base toward its tip, which helps a tree look mature and natural. Stems thicken more where they support and connect more foliage, so a single retained branch thickens the trunk below it, with a fairly sudden change in width at its junction, while smooth, gradual taper is usually built over years by growth at several heights.Open the glossary), and does it have some movement, or is it a straight, even pole? Then the branches: a few that start low, at useful heights, give you real choices for a first design. Their number matters much less. Nursery stock is grown to look full in a garden, so it often has dozens of thin branches along a thin stem, most of which a first styling will remove (Course 10, Wiring and First Styling).
Practice check · not scored
The base: root flare and graft union
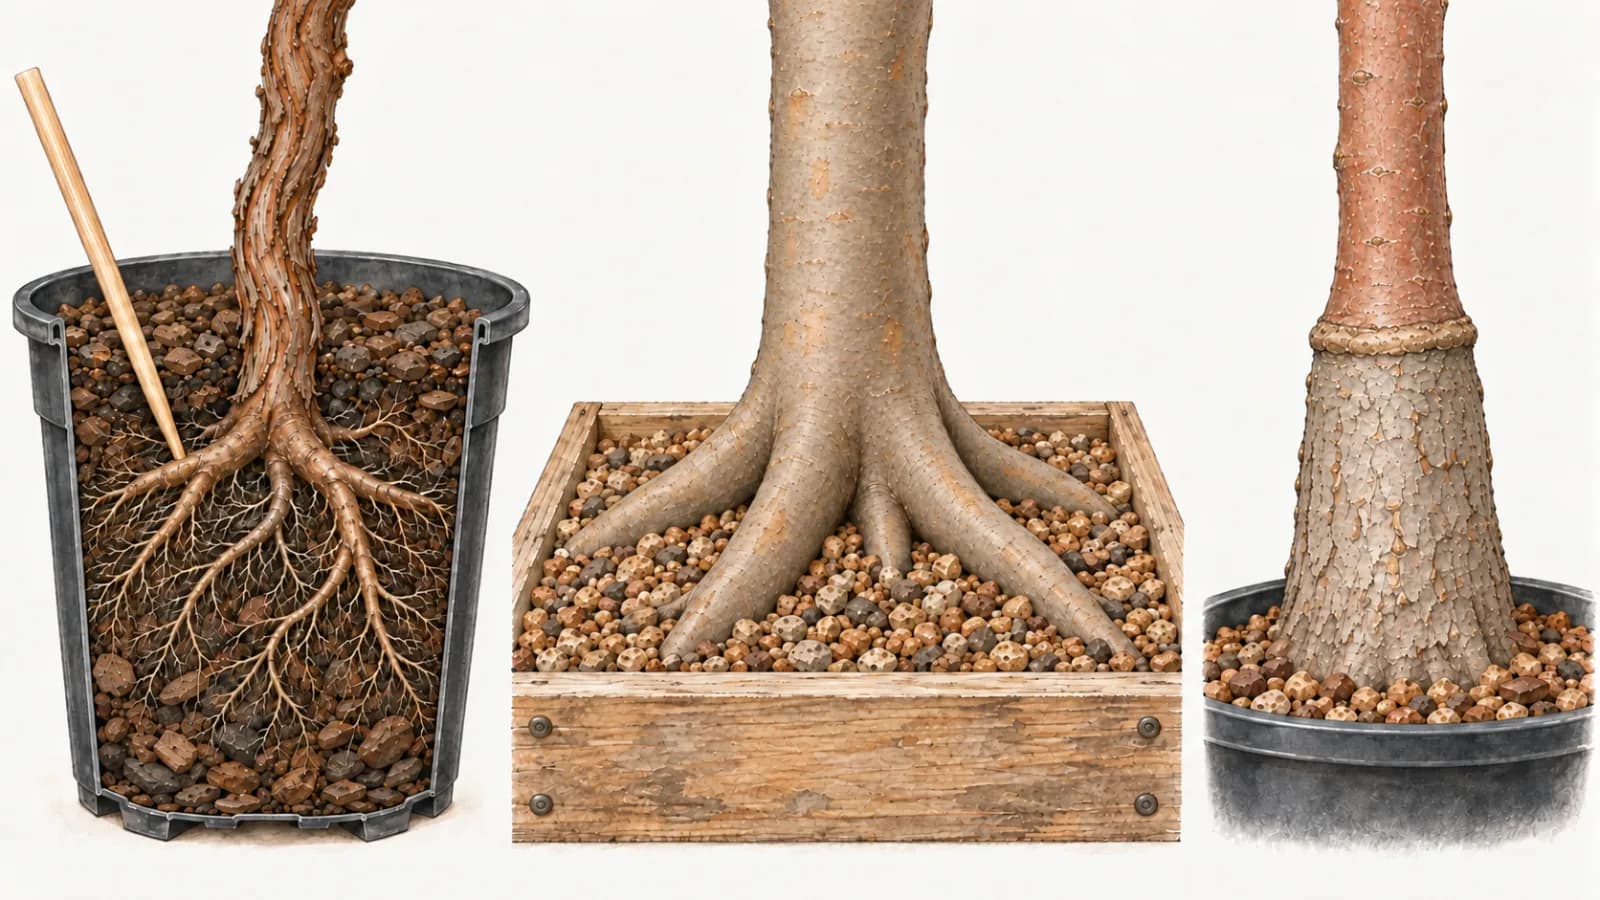
The root flare is where the trunk widens and spreads into its main structural rootA thick, woody, long-lived root that anchors the tree, stores carbohydrates, and connects the fine roots to the trunk, conducting water and sugars along its length. Structural roots absorb relatively little water compared with young fine roots.Open the glossary (Course 01, Lesson 2). A visible flare that spreads evenly in several directions makes a bonsai look stable and old (bonsai growers call the visible spread of surface roots nebari), and it is one of the slowest features to create, so it adds a lot of value.
In nursery pots the flare is often buried, because young trees are potted up, sometimes deeper, and topped up with mix. Probe gently with a chopstick or a finger close to the trunk until you meet the widening roots. A buried flare is common and, in the short term, not a health problem; it can be uncovered gradually later (Course 11, Repotting and Root Development). Note how deep it is and whether the roots spread evenly or all run one way.
Also look for a graft unionThe join where a shoot or bud of one plant (the scion) was grafted onto the roots and lower stem of another (the rootstock). It often shows as a swelling, a step in thickness, or a change in bark, and on a bonsai trunk it can stay visible for life.Open the glossary, the join where a shoot of one plant was grafted onto the roots and lower trunk of another. It shows as a swelling, a step in thickness, or a change in bark, usually low on the trunk. Many cultivarA cultivated variety: a plant selected for particular traits, such as compact growth, small leaves, or unusual color, and kept consistent through propagation, often by cuttings or grafting. Cultivar names appear in single quotes, as in Juniperus procumbens ‘Nana’.Open the glossary, including many Japanese maples, pines, and flowering trees, are grafted. A sound union does not harm the tree, but on a bonsai it can stay visible for life: a neat one near the soil matters far less than a bulge partway up the trunk.
The root zone
The roots decide whether a tree can recover from anything else, so this check matters most.
- Firmness. Rock the base of the trunk gently: the root ball should move with the pot. A trunk that wobbles in the mix has few roots holding it, because it was potted up recently or because roots have died. Ask, and look closer.
- Moisture. Lift the pot and push a finger into the mix: neither bone dry nor soggy. A root ball that has shrunk away from the pot wall has dried right out, water poured in runs down the gap, and many of its fine roots have probably died (Course 01, Lesson 14). A pot that stays heavy and wet with a sour or rotten smell suggests roots short of oxygen (Course 01, Lesson 7). Healthy mix smells earthy.
- Root tips. With the seller's permission, ease the root ball out of its pot. Plenty of pale, plump root tipThe growing end of a root, made up of the root cap, the dividing cells behind it, and short zones where new cells lengthen and mature. Active tips are usually pale or white and show where a root is extending into fresh substrate.Open the glossary at the edge show roots that are growing (Course 01, Lesson 2). Dark, shriveled, or mushy roots with no tips anywhere are a bad sign.
A pot so full of roots that they circle the wall and mat at the bottom is root-boundDescribes a container plant whose roots fill the pot, circling the walls and matting at the bottom. A mildly root-bound nursery tree is common and often healthy. A badly root-bound one dries out quickly, and circling roots are dealt with at repotting.Open the glossary. A mildly root-bound nursery tree is common and often healthy, and roots poking out of a liner's drainage holes simply mean it is ready for a bigger container. A badly root-bound tree, though, dries out fast. Circling roots are dealt with at repotting (Course 11), not at the bench.
Label and provenance
A full scientific name on the tag lets you look up the tree's needs (Lesson 2); “Ficus” or “juniper bonsai” alone does not. Then ask about the tree's provenanceWhere a plant came from and how it was grown: the nursery or source, its climate, and whether it grew outdoors, in a heated greenhouse, or abroad. It hints at how ready a tree is for your conditions and how carefully to acclimate it after you buy it.Open the glossary: where it came from and how it was grown. A tree grown outdoors at a nursery nearby has already lived through local winters and is used to outdoor sun. A tree from a heated greenhouse or a shop shelf may have soft leaves grown in weaker light and little cold acclimationThe gradual process, triggered by shortening days and falling temperatures, in which a tree's tissues become able to survive freezing. A tree moved suddenly from a warm room into frost has not acclimated and can be badly damaged. It is not the same as shoots hardening, or turning woody, though the two often happen around the same time.Open the glossary (Course 01, Lesson 13), so it needs a careful transition to its new home (Lesson 3). An imported tree may have grown in a quite different climate, so ask how and where. Origin matters for hardiness too: trees of the same species raised from seed collected in a warmer place can be less cold hardy than those from a colder one.
Practice check · not scored
Match the material to the goal
A healthy tree must also be useful for what you want to learn, able to live in the place you have, and within what you can spend and wait. Settle four things before you shop:
- Your goal. Care and a first styling this year? A thick trunk over many years? A tree for one particular spot?
- Your place. What your site profile says it can offer (Lesson 1), especially light (Lesson 4) and winter cold. A temperateDescribes regions with distinct warm and cold seasons, and the trees adapted to them, which typically need a cool winter rest. Trident maples and the junipers commonly grown as bonsai are temperate trees and need seasonal outdoor conditions rather than a warm room all year.Open the glossary tree needs its outdoor seasons; only tropicalDescribes warm regions near the equator without a cold winter, and the trees adapted to them. Tropical trees such as ficus have no chilling requirement and can be damaged or killed by frost; their growth slows when light or warmth drops.Open the glossary and some subtropical trees can live indoors, and then only in strong light (Lesson 3).
- Your budget, with something left over for a pot that drains and a few basics (Lesson 7).
- Your patience. How many years you will wait before there is something to style.
For a home with no outdoor space, such as the bright window, the place alone narrows the choice to trees that can live indoors, such as a tropical ficus, inspected with extra care. (The bright window faces south, the sunny side in the Northern Hemisphere; in the Southern Hemisphere, swap north and south.)
In Inspect five starting trees, you meet the five candidates from the start of this lesson. Under Tree, choose one, from A · Nursery juniper to E · Chinese elm liner, and press its six buttons, from Foliage to Label and source; each finding is tagged Good sign, Worth knowing, Check closer, or Warning sign. Inspect at least A, B, and D in full, comparing A with D, the same kind of juniper at two prices. Then, under Choose a tree for each goal, take each Goal in turn, read its Assume: line, and choose a tree, or Keep looking.
Exercise
Inspect five starting trees
Inspect the trees
Tree A · Nursery stock
Nursery juniper Juniperus procumbens 'Nana'
On the outdoor sales bench in a black 4 L (1 gallon) nursery pot.
Low price
Inspect tree A
0 of 6 checked
Choose a part to inspect. The picture zooms in on it, and your finding appears here.
Choose a tree for each goal
Learn care and a first styling this year on a small budget.
Assume: You have a sunny outdoor spot, such as the west balcony or the small backyard.
Text description
Five instructional-example trees for sale at a garden center on a late-spring visit, each with six things to inspect: foliage, trunk and branches, base and root flare, root zone, pests, and label and source. Inspecting a part shows what you find and what it tells you.
Tree A, Nursery juniper (Juniperus procumbens 'Nana'). Nursery stock, low price. On the outdoor sales bench in a black 4 L (1 gallon) nursery pot.
- Foliage: Dense blue-green foliage all the way into the center, with soft, paler new growth at the branch tips.
- Trunk and branches: Several branches start low, near the soil, and spread out over the rim. The main stems are still thin, about as thick as a finger.
- Base and root flare: No flare shows at the surface. Probing gently with a chopstick finds the trunk widening into roots about 3 cm (just over 1 in) down.
- Root zone: Firm, with no wobble. The mix is moist, not soggy, and smells earthy. With the staff's OK you ease the root ball out: plenty of pale, plump root tips at the edge, and a few roots starting to circle.
- Pests: No webbing, sticky residue, or bumps on the needles or stems. Tapping a branch over a sheet of white paper drops nothing that moves.
- Label and source: The tag gives the full name, Juniperus procumbens 'Nana'. Staff say it was grown outdoors at a regional nursery.
Tree B, Mall-bonsai ficus (Ficus, species not given). Mass-market bonsai, mid price. On an indoor gift shelf, in a glazed pot with stones glued over the surface.
- Foliage: Most leaves are glossy and dark green, but a few inside the canopy are yellow, and some have dropped onto the stones.
- Trunk and branches: A thick, smooth gray trunk with an S-curve, already shaped. A few branches end in long shoots with leaves only at their tips.
- Base and root flare: Hard, glued stones cover the whole surface right up to the trunk, so the base and any surface roots are hidden.
- Root zone: The trunk does not move, but a hard crust would hold it steady even with few roots, and it stops you from feeling the mix or seeing any roots. The pot has a drainage hole; whether the mix inside is wet or dry, you cannot tell.
- Pests: Small, brown, raised bumps on a few stems and along the midribs under some leaves, and a shiny, sticky patch on a leaf below them.
- Label and source: The tag says only “Ficus”: no species, no grower. Staff think it came from a greenhouse supplier. It has been indoors under the shop's ceiling lights for a few weeks.
Tree C, Pre-bonsai trident maple (Acer buergerianum). Pre-bonsai, high price. In a wooden grow box in the nursery's outdoor bonsai area, grown there from a young tree.
- Foliage: Full, even green three-lobed leaves in opposite pairs, with strong new shoots this spring.
- Trunk and branches: A thick trunk with good taper. It was cut back hard two years ago, and a new leader (the shoot that will become the new top) grows from just below the cut. The large cut scar is closing, with a rolled ridge of new wood around its edge.
- Base and root flare: The trunk flares into strong surface roots that spread in several directions. There is no graft union, the swollen join where a top is grafted onto a different rootstock.
- Root zone: Firm in the box. The gritty, free-draining mix is moist. Roots fill the box evenly, with plenty of pale tips and no thick circling roots.
- Pests: Leaf undersides and shoot tips are clean: no aphids, webbing, or sticky residue.
- Label and source: Labeled Acer buergerianum, trident maple. Grown outdoors at this nursery for years, through local winters.
Tree D, Half-price juniper (Juniperus procumbens 'Nana'). Nursery stock, on clearance, half price. On the clearance bench, in the same kind of nursery pot as tree A.
- Foliage: Much of the inner foliage is brown and dry. The outer foliage is a dull gray-green, with no fresh growth at the tips in late spring.
- Trunk and branches: A few branch tips are bare, gray, and brittle. They snap instead of bending.
- Base and root flare: Like tree A, the flare is buried a few centimeters down. The mix at the surface is pale, dry, and crumbly.
- Root zone: The pot feels light. The root ball is bone dry and has shrunk away from the pot wall, leaving a gap. Water poured in would run down the gap and out without wetting the roots.
- Pests: No webbing, sticky residue, or bumps. Tapping a branch over white paper drops nothing that moves.
- Label and source: Same name and grower as tree A. Staff moved it to the clearance bench after it was missed by the watering, and nobody knows for how long.
Tree E, Chinese elm liner (Ulmus parvifolia). Liner (a rooted cutting), lowest price. In a small 9 cm (3.5 in) pot among the nursery's young plants, outdoors.
- Foliage: Small, glossy, toothed leaves, bright green, with new shoots growing at several tips.
- Trunk and branches: A single stem about as thick as a pencil, with a few thin side shoots. No taper or movement yet.
- Base and root flare: Young roots just below the surface and no flare yet. It was grown from a cutting, so there is no graft union.
- Root zone: Firm and moist. White roots poke out of the drainage holes: the small pot is full of roots.
- Pests: Leaf undersides and the soft new tips are clean.
- Label and source: Labeled Ulmus parvifolia, Chinese elm, rooted cutting. Grown outdoors at this nursery.
Then three goals, each with stated assumptions. For each goal, choose one of the five trees or choose to keep looking. Feedback explains the tradeoffs of every choice, and some goals have more than one defensible start.
- Learn care and a first styling this year on a small budget. Assume: You have a sunny outdoor spot, such as the west balcony or the small backyard.
- Grow a thick-trunked tree over many years. Assume: The small backyard has room for a large container or a bed in the ground, and you are in no hurry.
- A healthy tree for a bright apartment window. Assume: The bright window: a south-facing sill, 20 to 22 °C (68 to 72 °F) all year, dry air in winter, and no outdoor space.
Tree D was a Walk away for every goal: a dried, shrunken root ball, brown inner foliage with no new growth in late spring, dead tips, and a history of missed waterings are four warning signs that agree, and no discount buys back dead roots. Tree A, the same kind of juniper for a little more, had five good signs and one thing worth knowing: its buried flare, a feature to deal with later rather than a fault. Tree B was mostly Check closer: not bad news, but unknowns to settle before you trust it.
The goals gave the same trees different answers. On a small budget, only A fit: healthy, cheap, with low branches to style, and wanting the outdoor sun you can offer. For a thick trunk, the pre-bonsai maple fit if you can pay for its years, and the elm liner if you will grow those years yourself. For the window, only the ficus could work, and only with conditions; waiting was also sensible. And price was no guide to health: the cheapest and the most expensive trees were both healthy, and the discounted one was in declineA gradual loss of health and growth over months or years, usually from several stresses acting together, such as poor light, root problems, or a missing winter rest. Early signs are subtle, so comparing dated records over time helps catch it.Open the glossary.
Two healthy, inexpensive trees can teach you more than one expensive one: you can compare them, style one while the other grows freely, and treat a mistake as a lesson rather than a disaster. As for where to buy: garden centers sell nursery stock; specialist bonsai nurseries sell liners, pre-bonsai, and developed trees, and usually know their trees' names and histories; and local bonsai clubs often hold sales and know which trees do well in your climate.
Before you pay
The bonsai decision
Check health first, then choose for your goal
Starting point
For a first tree, choose healthy nursery stock of a kind that suits your place, or two or three inexpensive trees, perhaps a liner among them to grow on, from a seller who can tell you what they are and how they were grown. At the bench, check:
- Fit: a full name, and needs that match your place and the light and winters it offers.
- Source: where and how it was grown: outdoors nearby, in a greenhouse, or abroad.
- Foliage and growth: color and density normal for the tree and the season, with new growth or plump buds.
- Pests: clean undersides, tufts, and stems; no webbing, sticky residue, bumps, or cottony patches; nothing moving on the white paper.
- Trunk and branches: sound bark, some taper or movement, and branches low enough to give you options.
- Base: the flare found, gently, and any graft union noted.
- Root zone: firm in the pot, moist but not soggy, an earthy smell, and root tips at the edge if you may look.
Walk away, whatever the price, from:
- a root ball that is bone dry and shrunk from the pot wall, or soggy and sour-smelling;
- brown or dull foliage with no new growth when the tree should be growing, or dead tips on many branches;
- pests spread over much of the tree;
- a tree that cannot live in the place you have, however healthy it is.
This assumes
You know what your place can offer (Lesson 1) and what the tree needs (Lesson 2). You are buying in person in the growing season, when new growth shows how a tree is doing; in the example climate, garden centers have the most stock from mid-spring into early summer. The seller lets you look closely, ideally at the root ball too.
Change course if
- You are buying online or by mail. Ask for photos of the whole tree from several sides, the base, leaf undersides, and the drainage holes, and ask where and how it was grown. Buy from sellers who answer clearly.
- The tree is dormant, or it is winter. A deciduous tree is bare and a juniper may be bronze, both normal. Judge from plump, firm buds and twigs that flex rather than snap, and check the root zone as usual.
- You find a “check closer” sign, such as a tag with no species, a root zone hidden under glued stones, or bumps that might be scale. Ask, look with a hand lens, or come back another day. Buy once the answers satisfy you, not before.
- The tree comes from a greenhouse, a shop shelf, or an import. Plan its acclimationThe gradual adjustment of a plant to new conditions, such as stronger light, colder nights, or drier air, which takes days to weeks. A tree moved suddenly into very different conditions has had no time to acclimate and can be damaged, so bonsai are moved to new places in steps. Cold acclimation is one kind.Open the glossary before you buy (Lesson 3), and plan to keep it apart from other plants for a few weeks (Lesson 8).
- You are tempted by a developed bonsai. Ask how it has been cared for, when it was last repotted, and where it spent last winter, and find a teacher or club before you take it home.
Back to the question
Which tree is the best start for what you want to learn, and how can you tell it is healthy?
The best start fits what you want to learn, the place you can offer, your budget, and the years you will wait. For care and a first styling soon, healthy nursery stock suited to your place is usually best. For a thick trunk, grow young trees freely in the ground or a large container, or pay for those years in pre-bonsai. A developed bonsai suits someone who can already keep one. You can judge a tree healthy when several signs agree: foliage normal for its kind and the season, new growth or plump buds, clean undersides and stems, sound bark, and a firm root ball, moist but not soggy, with live root tips. Check health before price: a cheap tree in decline is no bargain.
Key takeaways
- Every starting point sits somewhere on a long path: grow the trunk and roots (the longest phase), build the main structure, then refine. What is already done is largely what you pay for.
- Trunks thicken slowly in small pots and when trimmed, and much faster growing freely in the ground or a large container.
- Check health before price: foliage and new growth for the tree and the season, pests, sound bark, and above all the root zone. Green foliage alone is weak evidence.
- A buried flare, a few circling roots, glued stones, and a vague tag call for a closer look or a later fix; a dried-out or soggy root ball, no new growth in the growing season, and widespread dieback are reasons to walk away.
- Match the material to the goal, place, and budget. Healthy, inexpensive trees teach the most at first, and two can teach more than one expensive tree.
Optional · not required for completion
Inspect three trees, buy none
Take a sheet of white paper and a chopstick to a garden center or nursery, and choose three trees of kinds that would suit your place. Asking before you handle anything, work through the checklist for each, and ask staff where the trees were grown. Note one good sign, one thing to check closer, and any warning sign for each. Which would you buy for your goal, and which would you walk away from?
No tree? Look at three listings for starter trees on a bonsai nursery's website. What can the photos show you, and what can they not, such as the flare, the roots, and the leaf undersides? Write down the questions you would ask the seller before buying.